Showing posts with label Food. Show all posts

Monday, February 4, 2013

Curried Cous Cous Salad with Chicken & Apple


Children, without a doubt, model their parent's behaviors, both good and bad.  Therefore, I firmly believe that if I take care of myself, my children are bound to follow.  We generally eat pretty healthy in our house, but I have been making an effort to kick it up a notch post-baby to get my body back in shape and keep my energy level up.  Two things I have done recently is joining the YMCA and cooking quick, healthy meals every night that both satisfy and taste delicious.

With these small changes, the baby weight is starting to shed itself and my energy level is back to a place that doesn't make the demands of a toddler and newborn unbearable. (It also helps that Claire, has been a pretty good sleeper.  So, the sleep deprivation is minimal compared to my first newborn experience...which was sleep deprivation hell!)

This cous cous salad has quickly become a new staple in our household.  It literally comes together in 15 minutes and it is crazy delicious and packed with nutrition.  I serve it warm the first night I make it, but is great cold out of the fridge the next day too.


Curried Cous Cous Salad with Chicken & Apple
Adapted from Weight Watchers

Serves 6

1 1/2 cups water
1 1/2 teaspoons curry powder
1 teaspoon kosher salt
1 cup plain cous cous
1 (15 1/2 oz) can chickpeas, drained and rinsed
1 red apple, unpeeled, cored and diced
1 cup chicken breast, chopped, from a rotisserie chicken
2 green onions, sliced
3 tablespoons lemon juice
1 tablespoon olive oil
6 ounces spinach

Bring the water, 1 teaspoon curry powder and 1/2 teaspoon salt to a boil in a medium saucepan. Add the cous cous, cover and remove from the heat.  Allow to stand for 5 minutes, until all the water is absorbed and then fluff the cous cous with a fork.

Meanwhile, in a large bowl combine the chickpeas, apple, chicken, green onions, lemon juice, olive oil, remaining 1/2 teaspoon curry and remaining 1/2 teaspoon salt.  Add the cous cous and stir to mix.  Divide the spinach among 6 bowls and top with the cous cous mixture.  Then hurry up and...

EAT IT!!

Saturday, March 31, 2012

Sweet Potato Lasagna with Brown Butter Cream Sauce


This lasagna was born from leftover ravioli filling I made during a ladies night cooking feast at my house.  I had some ladies over to teach them how to bake bread and make ravioli and what a blast we had.  I love it when friends come pounding at my door to infiltrate my house for a night of cooking, laughter and wine.  When my dear friend Danesa asked if she and a couple of her friends could come over and learn to a cook a few things with me, how could I say no?

I pondered over what we should make and finally decided on focaccia bread and a sweet potato ravioli I'd been drooling over for awhile on Picture Perfect Meals.  I picked these items because people often think that making bread from scratch if hard or even impossible and I always love opening up people's eyes to how easy it really can be.  The same goes for pasta, although it helps tremendously to have a pasta roller which, perhaps, everyone doesn't have in their kitchen.


The night was a wild success and a wild amount of fun.  Seriously, with all these awesome ladies and kiddos taking over the kitchen, how could it not have been a blast?  Plus, the food was out of this world and everyone was pretty impressed in what we rolled out of the kitchen in only, ahem, five short hours. 


The next day I found myself staring at an obnoxious amount of sweet potato ravioli filling and wondering what the heck to do with it.  I am very much a recipe cook, and have only recently started branching out and trying a few of my own creations.  One thing I do know how to make recipeless, and darn good too, is cream sauce.  I also know that brown butter makes everything taste better.  Could I possibly turn this into a brown butter cream sauce?  I am positive that God was speaking to me at this point, because who else could have put such a divine thought into my head?  Woo wee, am I glad I listened closely to that voice and made this sauce.  I'm not gonna lie, this lasagna is rich, but its that kind of rich that melts in your mouth and tells your whole heart, body and soul that life is soooo-ooo-ooo good.

PRINT THIS RECIPE!

Sweet Potato Lasagna with Brown Butter Cream Sauce
8-10 servings

Filling:
3 large sweet potatoes
3 garlic cloves, minced
1 cup creamy ricotta (recipe here, or storebought will do too)
1/2 cup parmesan, grated + 1/4 cup for topping
1 1/2 teaspoons ground sage
1/2 teaspoon cinnamon
1/4 teaspoon ground nutmeg
1/8 teaspoon cayenne pepper
1 teaspoon kosher salt
1 egg
1/2 cup mozzarella, shredded

Noodles:
(store bought noodles will work too, but I prefer the taste and texture of fresh pasta)
3 eggs
2 cups all-purpose flour
1 tablespoon olive oil

Sauce:
4 tablespoons unsalted butter
1/4 cup flour
2 cups milk (I used whole milk)
1 teaspoon kosher salt

Garnish:
1/2 cup pecans, toasted and roughly chopped

Make the filling: Preheat oven to 425F.  Scrub the sweet potatoes and then prick them all over with the tines of a fork.  Place on a baking sheet and bake in the oven for 45-55 minutes, or until a fork inserted in the middle passes easily through.  Allow to cool completely, then cut in half and scoop the middle out into a large bowl.  Add all remaining filling ingredients, except 1/4 cup parmesan and mozzarella, and stir to thoroughly combine.  Set aside. 

Make the noodles: Combine all ingredients in a food processor and process until it forms a soft shaggy dough.  Dump out onto the counter and knead into a ball.  If not using immediately, wrap tightly in plastic wrap and store in the fridge.

Cut the dough in quarters and, taking one section at a time, run through a pasta roller to the third thinnest setting (this is a 6 on my KitchenAid roller).  Lay on a generously floured counter.  Repeat with remaining dough pieces. 

Just before assembling the lasagna, bring a large pot of water to a boil.  Cook lasagna noodles in boiling water for 2-3 minutes, until barely cooked through (they'll finish cooking in the oven).  Drain.

Make the Sauce: In a medium saucepan, melt butter over medium heat until brown and the butter has a nutty fragrance, 6-8 minutes. Watch the butter carefully to avoid burning and add the flour when the butter has just turned brown.  Whisk the butter and flour constantly for one minute, then add the milk.  Whisk the milk constantly over medium heat until the sauce starts to thicken, 7-8 minutes.  When the sauce has thickened, remove from the heat and stir in the salt.

Assemble the lasagna: Set oven temperature to 375F.  Lightly spray the bottom of a 9 x 13" baking dish with non-stick cooking spray.  Spread 1/2 cup cream sauce on the bottom of the baking dish.  Layer noodles to cover the bottom of the dish.  Spoon half of the sweet potato filling on top of noodles and cover with 1/2 cup sauce.  Repeat with one more noodle, sweet potato, sauce layer and then add another layer of noodles to the top.  Spoon the remaining sauce on top of the noddles then sprinkle with reserved 1/4 cup parmesan and mozzarella. 

Bake covered with tin foil for 20 minutes.  Remove the foil and bake an additional 15-20 minutes or until the top is lightly browned and bubbly.

Allow to sit for 5 minutes before cutting.  Serve with a sprinkling of the toasted pecans.  Then you should probably...

Eat it!! 

Sunday, March 25, 2012

Kitchie Tip: How to Make Chocolate Curls

Before getting to the promised task at hand, I have some majorly big business to address.  First, (I am still in a state of shock and disbelief) thank you so much to everyone that voted me into the FoodBuzz Top 9 on Friday!  The Dark Chocolate Mocha Buttercream Cake I made last weekend was both fun and therapeutic for me, and the fact that it made into the Top 9 was a major win for me.  So, thank you, thank you and thank you!  I actually started crying when I read the first email congratulating me on Top 9.  It means a lot.

Second, I have a winner for the OXO salad spinner giveaway I posted last week.  The winner was lucky number 5, jwfong, which random.org selected for me.  Congratulations!  I'll be in touch shortly. 

Now, onto the star of the show...chocolate curls (like the ones on top of my cake that made the Top 9, surely it was the curls that got it there).

How-to: Chocolate Curls

3 ounces chocolate (I used bittersweet)
1 tablespoon coconut oil (shortening can be substituted)

Melt the chocolate and coconut oil in the microwave in 30 second increments, stirring after each increment, until completely melted and smooth.

Using an offset spatula, spread the chocolate on an overturned rimmed baking sheet, until smooth and evenly distributed.  Put the entire baking sheet into the freezer for 2 minutes. 


Remove from the freezer and, using an overturned metal spatula (turner), lightly push the chocolate away from you to form the curls.  If the chocolate is too hard, it will not curl and will look like this:

If this is the case, allow to sit at room temperature for 30-60 seconds more and then try again.  Repeat until the chocolate is the right temperature and the chocolate curls easily under the spatula, like so:


The chocolate will melt very quickly if touched, so try to to move the chocolate to a ceramic plate or other cool surface using the spatula.  Put them in the refrigerator as soon as possible and keep there until you are ready to use them.

Because the chocolate is spread so thinly, you will likely have to return it to the freezer several times during the curling process because it will begin to melt quickly.

When you are ready to use the curls, remove from the fridge and work quickly to decorate your cake/cupcake/etc. touching the curls as little as possible.  Once you've gussied up your awesome dessert with these curls, go ahead...

Eat it!!

Wednesday, March 21, 2012

Dark Chocolate Cake with Mocha Buttercream


I have been on a roller coaster of emotions these past few weeks.  If you've been keeping up with my posts, you know that life has had some ups and downs lately.  And these ups and downs have pulled me out of the kitchen and into real life.  This weekend I got to spend hours in the kitchen baking and decorating a cake for a friend's birthday and at the end of it I felt revived and renewed.  After spending hours on my feet I felt energized and truly alive for the first time in weeks.  I feel so fortunate to have something in my life that brings me (and others, for that matter) such joy.  I am breathing in gratefulness this week.  Life is good.  Oh is it good.

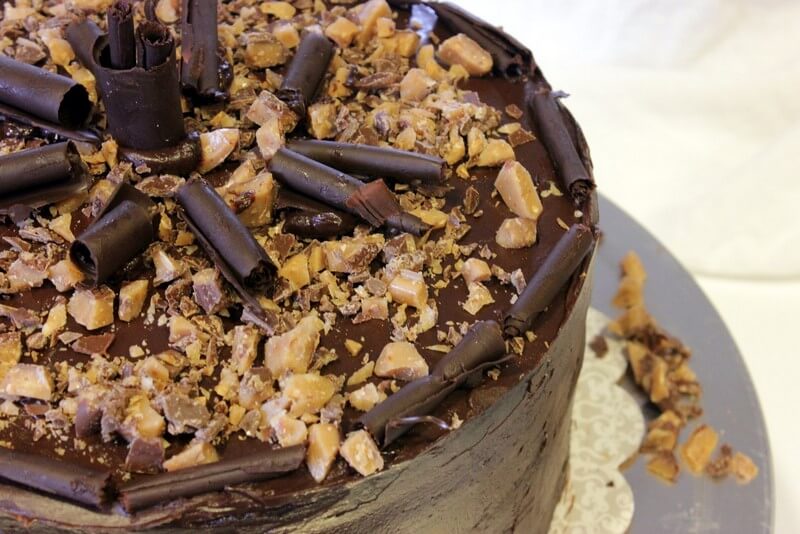
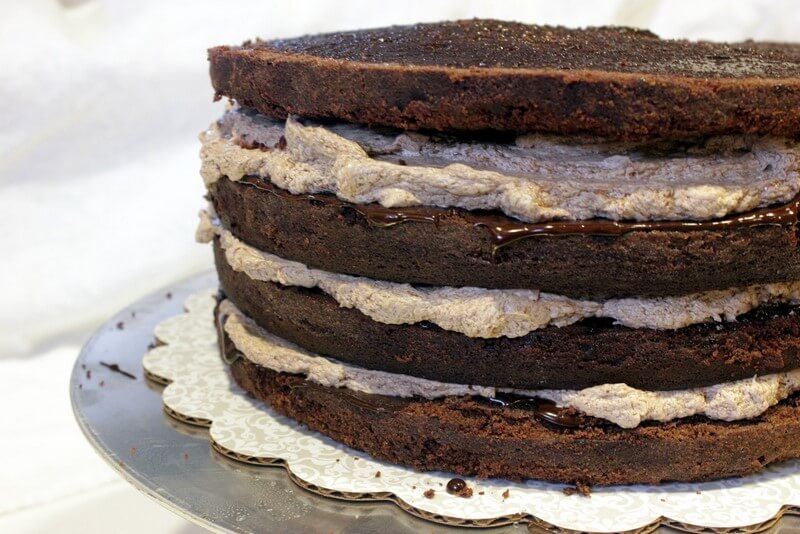
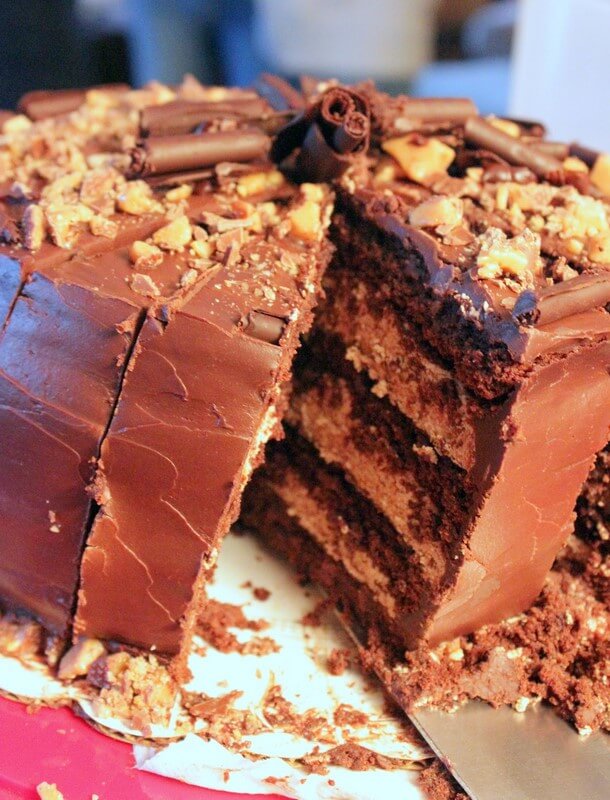
And so was this cake.  Actually, this cake was beyond good...it skyrocketed right past good, great, excellent and amazing, and fell unscathed into the lap of perfect.  This cake was all sorts of intense.  Four layers of dark chocolate cake....with layers of bittersweet espresso ganache...and mocha buttercream...topped with toffee and chocolate curls. 


I had an obscene amount of fun making this cake.  I love being challenged with a new recipe.  I love finding recipes with an absurd amount of steps that would have a  non-baker running away in terror.  I love when the end product looks and tastes as amazing as the amount of time I put into it.  Let's just say, this cake fulfilled the baking nerd in me.

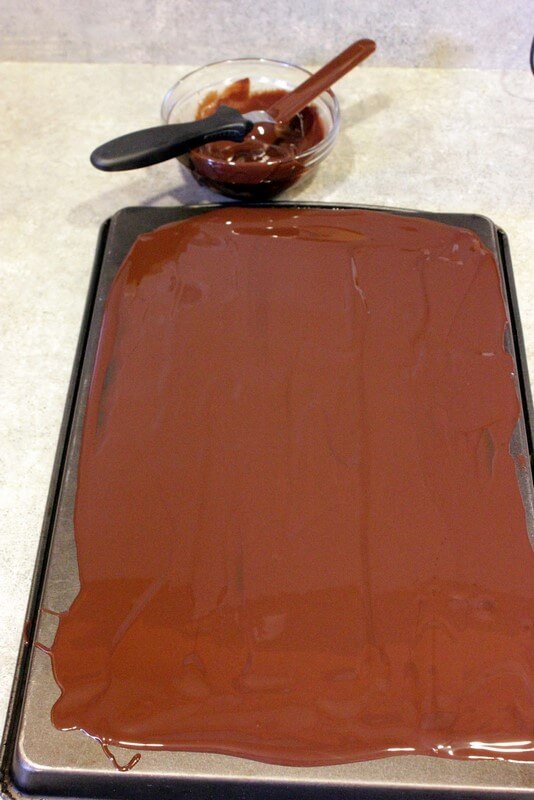
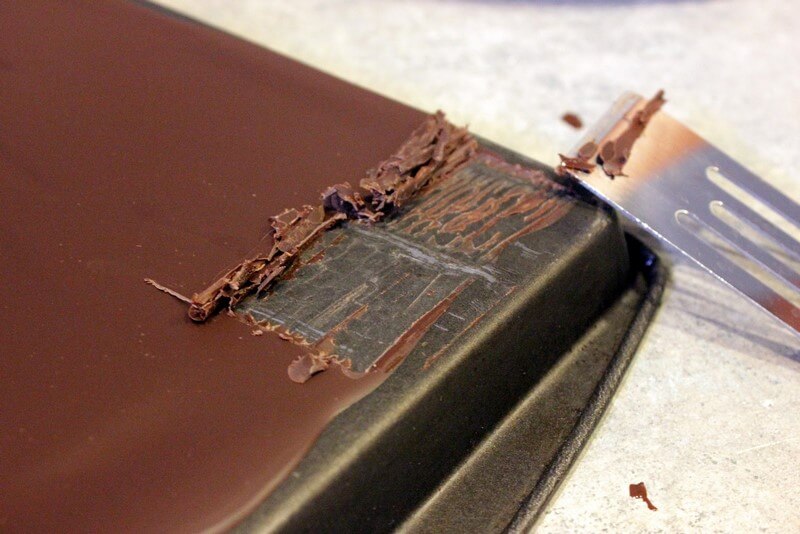
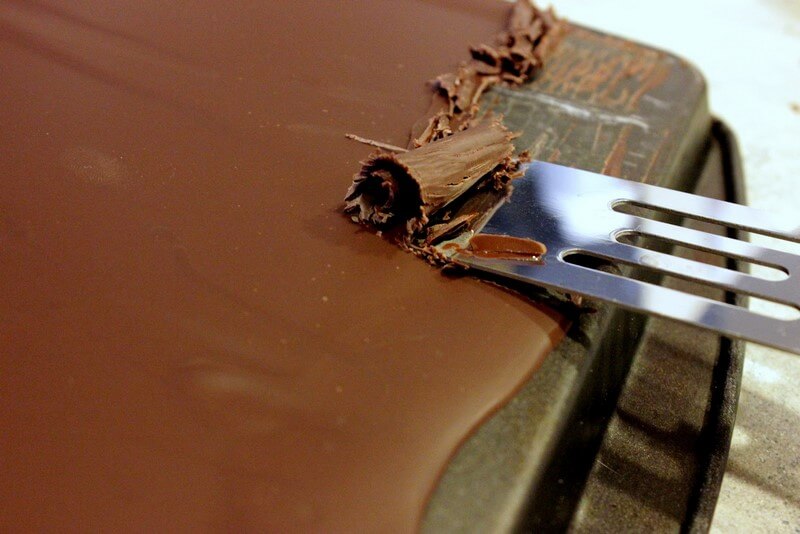
I also got to try my hand at making chocolate curls which filled me an irrational amount of giddiness.  The tutorial for the chocolate curls can be found here.  Such a fun easy way to gussy up a cake.

This was a conglomeration of several recipes.  The cake came from my all-time favorite baking book flour by Joanne Chang, the frosting and ganache were adapted from Southern Living and the idea for toffee and chocolate curls came from this little brain of mine.   This is definitely a special occasion cake because it takes some time, but believe me, it is worth every second you put into it. 


PRINT THIS RECIPE!

Dark Chocolate Cake with Mocha Buttercream & Toffee

Dark Chocolate Cake

Note: The cake can be made up to a week ahead of time.  Bake, allow to cool and then wrap tightly in plastic wrap and freeze.  Remove from the freezer about an hour before you are going to frost it.

1/2 cup (60 grams) dutch-processed cocoa
1 ounce (28 grams) unsweetened chocolate, finely chopped
1 cup boiling water
1 3/4 cup + 2 tablespoons (225 grams) cake flour
1/2 teaspoon kosher salt
1 teaspoon baking soda
1 1/2 cups brown sugar, packed
1 cup (2 sticks) unsalted butter, softened and cut into 1-inch pieces
1/4 cup (60 grams) creme fraiche
2 eggs
2 egg yolks

Preheat oven to 350F.  Butter, flour and line the bottoms with parchment paper of two 9-inch cake pans.

Combine cocoa powder and unsweetened chocolate in a small heat-proof bowl.  Pour the boiling water on top and whisk until completely smooth.  Place in the fridge for 45 minutes, whisking every 15 minutes,  until cooled to room temperature.

Combine flour, salt, baking soda and brown sugar in the bowl of a stand mixer fitted with the paddle, and mix until combined.  Add the butter and beat on low speed for 30-40 seconds, or until the mixture resembles a dough and is thoroughly combined.

Whisk the creme fraiche, eggs and yolks in a small bowl.  With the mixer on low, slowly pour the creme fraiche mixture into the dough until thoroughly combined.  Turn the mixer up to medium high and beat for 2 minutes until light and fluffy.  Stop the mixer and scrape down the sides of the bowl, then return the mixer speed to low.  Slowly pour in the cooled chocolate mixture.  Stop the mixer and scrape down the sides of the bowl, then mix on medium for 30-40 seconds until the chocolate is completely incorporated and evenly distributed in the batter. 

Pour the batter into the prepared pans.  Bake 30-40 minutes, or until a toothpick inserted in the middle comes out with just a few crumbs sticking to it.  Allow cakes to cool completely on a wire rack in the pan.  Once cooled, invert the pan on a flat surface and peel off the parchment paper.

Meanwhile....while you are waiting for your cakes to cool.

Mocha Buttercream Frosting

1/2 cup (70 grams) all-purpose flour
3 Tablespoons unsweetened cocoa powder
3 Tablespoons instant espresso powder
1 1/2 cups half-and-half
1 1/2 cups (3 sticks) unsalted butter, softened
1 1/2 cups powdered sugar
2 teaspoons vanilla extract

In a small saucepan, whisk together flour, cocoa, espresso powder and half-and-half.  Whisk constantly over medium heat for approximately 5 minutes or until thickened (it will resemble a pudding).  Transfer to a small bowl and cover the surface with plastic wrap to avoid forming a skin.  Set aside and allow to cool to room temperature, about 45 minutes.

When the mixture has cooled, beat butter and powdered sugar in a stand mixture fitted with the paddle attachment, until light and fluffy, about 4 minutes.  Slowly add the cooled cocoa mixture on low speed until thoroughly combined.  Add vanilla and beat on low for 20 seconds to combine. At this point the mixture should resemble whipped cream (dreamy creamy mocha whipped cream!).

While you're waiting for the buttercream to cool do this...

Dark Chocolate Espresso Ganache

2 tablespoons espresso powder
1 teaspoon granulated sugar
1/4 cup hot water
12 ounces dark or bittersweet chocolate, finely chopped
1 1/4 cups heavy cream
1 tablespoon butter

In a small bowl, combine the espresso powder and sugar.  Add hot water and stir to combine.  Set aside.

In a small saucepan, heat the cream over medium heat until just boiling, then quickly remove from the heat.  Pour the cream over the chocolate in a bowl and whisk until smooth and no chocolate chunks remain.  Stir in the butter and 3 tablespoons of the espresso mixture.  (The rest of the espresso mixture can be discarded.)

Allow ganache to stand at room temperature for 1 hour or until it is thick enough to spread.

Decorations

2 Heath bars, coarsley chopped
Chocolate Curls

Assembly

Simple Syrup - boil 1/2 cup sugar & 1/2 cup water for 2 minutes (the simple syrup isn't completely necessary, but I find it adds a lot of moisture to my cakes and is a simple way to really amp up the cake)

Note on cutting cake layers: There are definitely different camps on this, but I like to freeze my cakes for 20 minutes before cutting them.  Because the cake is firmer, I find it easier to work with and much easier to cut into layers. 

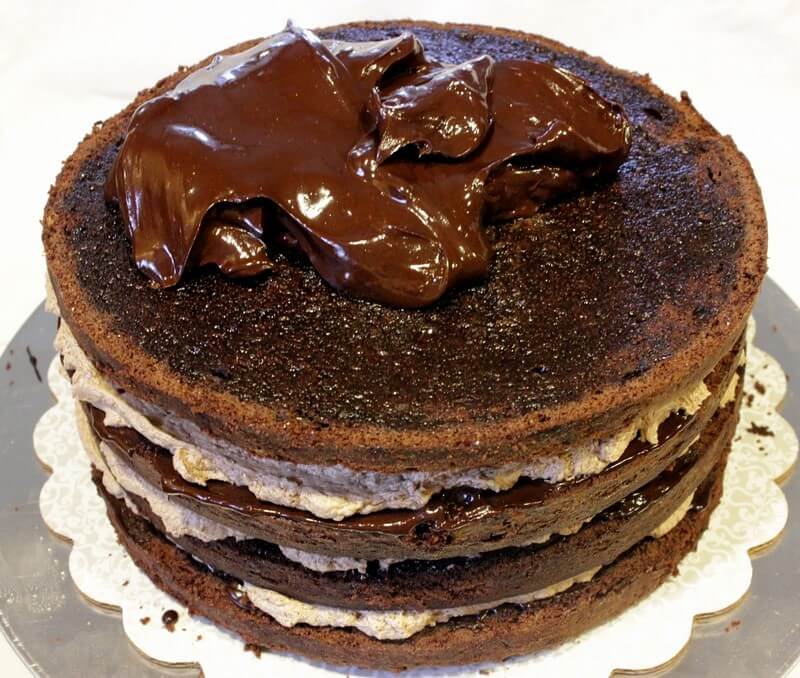
Cut each cake in half lengthwise so that you have 4 layers.  Put your first layer on a cake stand and brush generously with simple syrup.  And add enough ganache to thinly cover the top of the cake.  Next add 1/3 of the mocha buttercream on top of the ganache and gently spread to cover the top of the cake.  Repeat these steps two more times and end with an unfrosted cake layer on top, brushed with simple syrup.

Add several large dollops of the remaining ganache to the top of the cake and spread with an offset spatula on the top and down the sides of the cake.  Continue adding small dollops of ganache to the cake until the top and sides are completely covered with ganache.


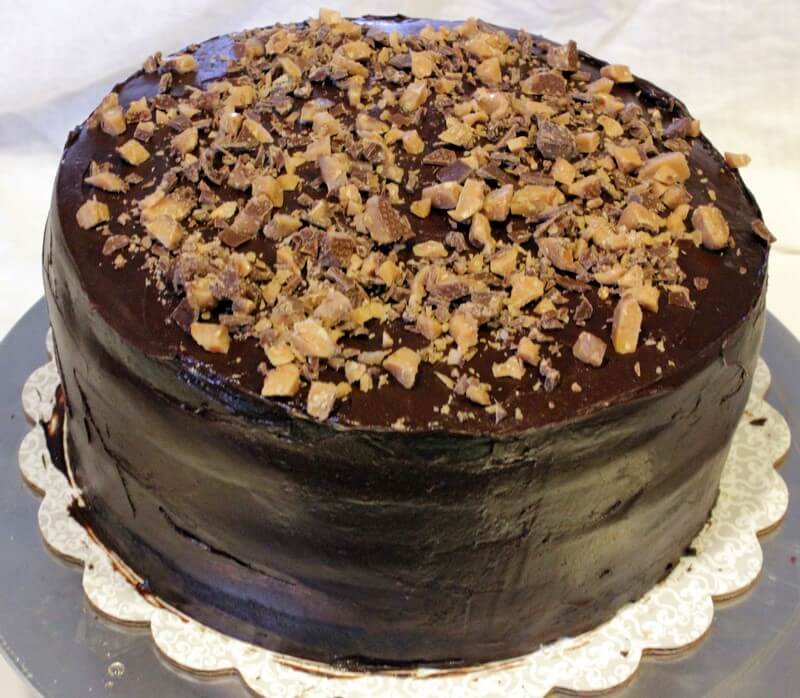
Now, this next part is up to you and how perfectionistic you are.  Smooth the sides of the cake with an offset spatula until desired smoothness is acheived.  You can spend a lot of time on this, so get it as smooth as you can tolerate, and then move on.  See Exhibit A...not perfect, but it'll do.

This is Exhibit A.

Now, toss a bunch of Heath on the top and wherever else you want to put it (try to stop yourself from putting it in your mouth, you'll get plenty of that later!).  Decorate with chocolate curls and finally...finally...you get to...

Eat it!!!

Sunday, March 18, 2012

Kale Chips & a Giveaway!


Life has slowed down a bit after the craziness of the past few weeks.  Between the St. Patrick's Day run  that I organized (with over 700 participants!), and my beloved dog passing away, I have been absent from Blogland much longer than I'd anticipated or liked.  I didn't realize until these past few weeks how much joy blogging gives me, and how much I would miss all of you. 

I am hopping back in the game now, and what better way to jump in than with a giveaway?!  My very first giveaway to be exact, thanks to the awesome folks at OXO.  I am so excited about what they sent me to share with one of you!!  A salad spinner!!  A very nice, sturdy, salad spinner.


Why am I so excited about a salad spinner?  For a few reasons:

1. My (very expensive) salad spinner that I've had for only a year broke about a month ago.  It was the kind where you pull the string to spin it and the string just snapped right off!  Rar!  OXO sent me a salad spinner too, to try out and review.  Great timing OXO, thank you!

2. I hate (hate) washing and drying lettuce and will only do this if I have a salad spinner.  Since my salad spinner broke I've been buying pre-washed salad mix, which isn't very budget friendly.  I'm back in action now...no more bagged lettuce equals a few more buck in my pocket!

3. I discovered the wonder that are kale chips the day before that stupid salad spinner broke.  The kale has to be pretty darn dry before you throw it in the oven.  I'm not even going to attempt that one without my precious salad spinner.  I am back in kale chip heaven.


Kale chips are the perfect food in so many ways.  I have a wild salt tooth, that can only be tamed by greasy, salty potato chips, or something equally unhealthy. Kale chips satisfy the crunchy salty beast inside of me almost instantaneously.  But...here's the good news, kale chips are super good for you!  Kale packs a nutritional punch that can't be ignored.  Kale is extremely low in calories (35 calories/boiled cup) and includes 100% of your daily vitamin K as well as being a great source for vitamins A, C & B6, manganese, fiber and potassium.  You go kale!  Work it!

The second reason kale chips are so awesome is that they are a snap to make.  Chop, spin, toss and bake.  Easy.  Even Anna could do it (except I don't let her near the oven, so actually on second thought, she couldn't do it).


The OXO Salad Spinner was a dream when making these chips.  The pump handle on the top is so much easier to use than the string-pull method of my stupid ex-salad spinner.  There is a non-slip bottom that allows for one-handed use of the salad spinner when pumping.  It has a good sized bowl that can be used separately as a bowl for your salad and the basket can also be used as a strainer.  Finally, this spinner dried my kale chips enough with just ten pumps to immediately toss them in olive oil and then the oven.  No waiting around for them to dry.  Hooray!  I am seriously in love, and so grateful to have gotten this awesome tool for my very own!

Do you want one too?  Well, you've got five separate opportunities to get in on the action.  You'll get one entry for each one of these you do.  Open to US Residents only!!

1. Leave a comment here telling me what you'd use this salad spinner for.
2. Like Kitchie Coo on Facebook, and leave a separate comment telling me that you did.
3. Like OXO on Facebook, and leave a separate comment telling me that you did.
4. Follow me on Pinterest, and leave a separate comment telling me that you did.
5. Follow me on Twitter, and leave a separate comment telling me that you did.

This giveaway will be open until 11:59 pm, MST, Wednesday March 21.  I will announce the winner on Thursday.  Good luck!!


PRINT THIS RECIPE!

Baked Kale Chips

1 bunch kale
2 tsp olive oil
1/2 tsp kosher salt

Preheat oven to 350F.

Remove stems from kale by folding the leaf in half and then cutting along the inside of the stem.  Rip or roughly chop the kale into bite sized pieces.  Rinse the kale under cold water and then spin in a salad spinner until very little water remains on the leaves.  (Alternately, you can rinse them and then press them dry between between paper towels.)

Toss the kale in olive oil and salt until completely coated.  Spread on a rimmed baking sheet in a single layer and bake for 15-18 minutes or until crispy.

Remove from the oven and...

Eat it!!

Sunday, March 4, 2012

Featured on German Foodie!

Hello friends...I am tired.  Please excuse my absence this past week.  I am in the midst of planning Run for the Luck of It, a 5k and 7-mile foot race I organize for the St. Patrick's Day holiday.  As always, it is all-consuming.  Fun, but all-consuming.

Which is why it comes at a perfect time that Sofie over at The German Foodie has chosen to feature me in one of her posts this week.  Each week Sofie chooses a blogger she follows and admires and does a write-up of them.  I am honored to take this spot this week!!  Thank you Sofie for your kind words.

Sofie is a German living in the U.S. and she shares some amazing German recipes on her food blog.  And, lots of bread recipes to boot.  If you know me, you know one of the quickest ways to my heart is through a good hunk of bread.  Sofie is witty, intelligent, an excellent photographer and an amazing baker and cook.  Please check her blog out at The German Foodie and see for yourself what a great space she has created.

So, I promise you, I have not fallen off the face of the earth.  I am just wearing my "Race Director" hat this week rather than my "Blogger" hat.  I will be back...it will just be after I collapse next Saturday afternoon in a heap of exhaustion and race director glory (or at least I hope!).  Until then...Top 'O the mornin', afternoon and evenin' to ya!

Tuesday, February 28, 2012

Homemade Pizza


Pizza...you are a cook's canvas.  A space for me to get creative.  A place to try out unusual flavor combinations on unsuspecting guests, and get away with it.  Pizza...you are a medium for experimentation and a place for all my favorite flavors to converge.  Pizza...you are the perfect food in every way.  I love you.

Not even kidding.  I will write a love letter to pizza any day.  I think pizza gets a bad rap for being junk food, but I will step in here and bash that idea on the head.  Pizza does not have to be a junk food.  Yup, it's bad if you load it up with a triple cheese, five meat, stuffed crust, quadruple bi-pass disaster.  But, if you pick your toppings wisely, you will end up with something that's OMG tasty and whole lot healthier.  Pizza does NOT have to be smothered in cheese and fatty meats in order to be good.  Don't believe me?  Read on my friends...


I love experimenting with new pizza flavors.  Where else can you have goat cheese, arugula, walnuts, honey and bread all wrapped into one little bite?  Or,  mozzarella, pesto, olives, roasted red peppers and spinach?  The possibilities really are endless, and you have all the power to make it as healthy (or unhealthy) as you choose.  I have discovered that I prefer pizzas that aren't smothered in gobs of greasy cheese.  Cheese is a lovely accent and definitely doesn't need to be a show stealer.  Sprinkling goat cheese, feta or fontina on the end gives pizza a boost without inundating the tastebuds and allowing all the other toppings to shine.  Keep the cheese to a minimum, experiment with new flavor combinations, and you are going to dig into a pizza that is not only healthier, but more delicious than you could have ever imagined.

Toppings are an absolutely critical piece of the pizza puzzle.  But, the crust...oh the crust.  This can make or break a pizza.  I have a crust recipe for you.  It is adapted from Cooks Illustrated and it is heaven sent...or at least Christopher Kimball sent, but you get the drift.  Its good.  It's better than any pizzeria crust I've had, with the exception of a genuine brick fire oven crust.  This recipe mimics a brick fire oven in your own oven, and the results are as close as you'll ever get to this at home (unless of course you have a brick fire oven pizza at home.  Duh).

Homemade pizza is the perfect meal for entertaining.  Whip the dough out before your guests arrive and have everyone join in the fun of decorating the pizzas.  Or give everyone a dough ball to create their own mini-pizza.

And, of course, no pizza party is complete without a cold local brew.  This is a particular favorite of mine from a local German brewery, Bayern.  It is a Doppelweizen, combination Heffeweizen and Doppelbock.  It is 7.5% alcohol...hence the name Face Plant (that and our little town's skiing problem obsession).


I'll share some of our favorite pizza toppings, but get creative!  Have a favorite flavor combo?  Add it to your pizza, you won't be disappointed.

-Pesto sauce, kalamata olives, roasted red peppers, chicken and a smattering of fresh mozzarella on top.  After the pizza cooks, add fresh spinach to the top and let sit for five minutes before cutting.  The spinach will wilt ever so slightly and your pizza will not be watery, which cooking spinach on pizza tends to do.

-Olive oil & garlic sauce, thinly sliced pears, chopped walnuts and a sprinkle of goat cheese.  After the pizza is cooked, add fresh arugula to the top and let sit for five minutes.  Drizzle with honey and then cut and serve.

PRINT THIS RECIPE!

**A note about this dough: it needs to sit in the fridge for a full 24 hours before using, so you'll need to think ahead and make this the day before.  Its worth the wait.**

"Brick Fire" Oven Pizza Dough

Makes 2 12-inch pizza crusts

3 cups bread or all-purpose flour
2 teaspoons sugar
1/2 teaspon rapid rise yeast
1 1/3 cups ice water (ice water must be used to prevent overheating in the food processor)
1 tablespoon olive oil
2 teaspoons kosher salt

In a food processor fitted with the chopping blade, add flour, sugar and yeast and process to combine; about 3 pulses.  With the processor on, slowly add water through the feed tube and process until just combined and there is no dry flour remaining.  Let dough sit in processor for 10 minutes.

After dough has sat 10 minutes, add oil and salt.  Process until the dough forms a ball that is satiny, sticky, and clears the sides of the processor bowl.  Remove the dough from the work bowl and knead on an oiled counter for one minute.  Form dough into a small ball and place in an oiled bowl.  Cover bowl with plastic wrap and place in the refrigerator for 24 hours and up to three days.

One hour before baking, remove the dough from the fridge and cut in half.  Form each half into a ball and place on a floured counter.  Cover with plastic wrap covered in cooking spray or a damp towel.

One hour before baking, place oven rack at second highest position, about 5" from the top heating element.  Put pizza stone (you can also use a regular baking sheet, but a pizza stone will give you better results) on the rack and preheat oven to 500F. 

After one hour, take one dough ball and lay on a floured surface.  Begin rolling out using a rolling pin to shape the pizza and then continue by stretching the pizza with your fingers until it is approximately 12".  Transfer to a well floured pizza peel or overturned baking sheet lined with parchment paper.  Re-shape and stretch dough approximately one more inch.

Add your sauce and then your toppings to the dough just before baking.

Now, the tricky part...transferring the pizza to the stone.  I have found that removing the stone from the oven and then sliding the pizza on works best.  If you are using a heavily floured pizza peel, just slide the pizza from peel to stone.  If you are using an overturned baking sheet lined with parchment paper, slide the paper and pizza directly onto the stone.  Baking the pizza with the parchment paper will not alter the baking process.

Bake for 10-12 minutes, or until crust is lightly browned.  Remove from the oven and allow to sit for 5 minutes before cutting and then...

EAT IT!!

Monday, February 20, 2012

Brown Butter Lemon Bars


If you know anything about my culinary passions, you know:

1. That I believe a little brown butter can make anything taste better.
2. Lemon desserts do not pass these lips. 
3. Ever.
4. Never Ever.
5. Unless...(see #1 above).

I heard your collective gasp, and I understand your confusion.  But let me help you understand, its pretty easy.  A little brown butter can make anything taste better.  Or even good.

I don't know what it is about me and lemons, but we just don't dig each other when it comes to desserts.  I 'll add lemon to risottos, pastas, roasted vegetables and dips.  But please, keep that fruit away from my sweets.  Except for this one time.

Here's the deal, I am not going to say I love these lemon bars and they are my new favorite dessert.  But, they were pretty good.  I ate a whole bar and I didn't even cry when I remembered I wasn't going to hit any chocolate. 

So, why, you ask, would I choose to make something I am so obviously at odds with in the first place?  I made them for this lady.  My mama. 


She and my dad were here visiting this past weekend and since her birthday was just a few days prior I had to make her something extra special.  Lemon bars were that thing.  More on that awesome visit to come, but now, without further ado...I present to you:

BROWN BUTTER LEMON BARS!


PRINT THIS RECIPE!

Brown Butter Lemon Bars
Adapted from Baking by James Peterson

16 servings

DOUGH
2/3 cup (94 grams) all-purpose flour
2/3 cup (94 grams) cake or pastry flour
1/2 cup powdered sugar
1/4 teaspoon kosher salt
1/2 cup cold unsalted butter, cut into 1/2" cubes
1 egg

LEMON CURD
1/2 cup unsalted butter
3 large eggs
3/4 cup granulated sugar
1 tablespoon lemon zest
3/4 cup fresh lemon juice (about 6 lemons)

Make the dough: combine the flours, powdered sugar and salt in a food processor and pulse until combined, about 5 pulses.  Add the butter and egg and process for 20-30 seconds or until the mixture just comes together.  Flatten into a disk shape, wrap in plastic wrap and refrigerate for at least 15 minutes.

In a medium saucepan, melt the butter on medium heat until light brown and the butter has a nutty fragrance.  Watch the butter carefully and remove from the heat as soon as it browns to avoid burning.  Set aside to cool for 10 minutes.

Preheat the oven to 450F. 

Make the lemon curd: Bring a saucepan of shallow water to a simmer.  In a heatproof bowl that will fit over the saucepan, add eggs and sugar and whisk for 2 minutes until the mixture is pale yellow.  Whisk in lemon zest, juice and brown butter and then set the bowl over the simmering water.  Whisk constantly for 8-10 minutes until the mixture starts to thicken.  Remove from the heat and cover with plastic wrap.  Press the plastic wrap onto the surface of the curd to avoid forming a skin.  Set the lemon curd aside.

Roll the dough out into a 9" x 9" square and then press the dough into an 8"x8" baking dish.  Press the extra inch of dough up the sides and then trim any excess dough to form an even crust all the way around.  Bake for 20-25 minutes, or until the crust is light golden brown.  Let the crust cool for 15 minutes on a wire baking rack.

Spread the warm lemon curd over the warm pastry and let cool for 30 minutes at room temperature.  Cover and refrigerate for at least two hours and up to one week, before serving.

Cut into squares and...

Eat it!!

Tuesday, February 14, 2012

This Guy...

Anyone out there think they have the best husband in the whole wide world?

Ah, sorry ladies and gentlemen.  You're wrong!  I snagged him up before any of you could.  Ha ha! Lucky me!  He's mine, all mine.

He's this guy...


He's also this guy...


And this guy...


He's also the guy that shovels the snow, mows the lawn, eats all the cookies (true story) and does ALL the driving (even that 18 hour road trip from Montana to Minnesota.  All.)  He goes to grad school full time, serves as a 2nd Lieutenant with the National Guard, hangs with Anna during the day while I work, often has dinner cooking when I get home and still manages to find time to snuggle up with me and have a glass of wine at the end of the day.

He's sweet, he's funny, he is compassionate, handsome, adorable, clever, hardworking and laughs so infectiously that it would make Oscar the Grouch smile.

He is the most amazing dad to Anna.  Man, those two are a pair.  My heart aches with joy and pride when I watch them together.  He is impossibly patient with her.  He teaches, he guides, he keeps her safe, keeps her smiling.

He is my best friend in the whole wide world.  I still get butterflies in my stomach when he calls me.  I cannot wait to get home at the end of the day and wrap myself up in his arms.  I know how lucky I am...I do.

So, even though we've never been big Valentine's Day celebrants, this is my love letter to you, today and everyday.  You are an amazing man Mace and I am honored to be married to you. Thank you for picking me.

As a tribute to my darlin' and Valentine's Day, I present to you these awesome heart healthy cookies.  I found these on Amy's blog over at Gastronome Tart and fell in love.  Still love you more Mace, but these are pretty darn good.


Oatmeal Quinoa (Heart) Cookie
Adapted from Gastronome Tart

Makes one giant heart cookie (or 12 regular cookies)

1/2 cup pecans
1 1/2 cups rolled oats
1/2 cup quinoa, cooked
1/2 cup dried cranberries
1 tsp vanilla
1/4 cup honey
2 egg whites
1/4 tsp kosher salt

Preheat oven to 350F.  Toast pecans for 4-5 minutes or until lightly brown and fragrant.  Cool slightly then roughly chop.

Add pecans, oats, quinoa, cranberries, vanilla and honey in a large bowl, stirring to combine.  Whisk the egg whites and salt in a small bowl until foamy and then pour over oat mixture, stirring to thoroughly combine.

Scoop entire mixture onto a parchment lined baking sheet and shape into a large heart. Alternatively, scoop handfuls out and form into large balls and place on cookie sheet.

Bake for 18-20 minutes or until golden brown.  Cut into pieces and...

Eat it!!


Friday, February 10, 2012

Roasted Beet & Brown Butter Pasta


I originally found this recipe when I was conjuring up new ideas for the plethora of beets we got in our CSA.  CSAs are awesome, but at certain times throughout the season they inundate participants with more of one vegetable than any family could possibly eat.  Beets were one of these things.


This meal has quickly become a favorite in our household.  I've even seen self-proclaimed beet haters take a liking to this pasta.  It says a lot about this dish.  Although, as we all know , a little brown butter makes everything taste better (and we all know this, right? If you don't, you should hop up on my little bandwagon).  Once the beets are roasted, this dish is very quick to put together.  Seconds.  Okay, I lie.  Naughty!  But it doesn't take long. 


This dish is beautiful...brilliantly red from the beets and topped with crumbled goat cheese.  Its a Valentine on a plate.  Can't you just see the look on your sweetie's face when they walk in the door on Valentine's Day and see this for dinner?  Pure love.


PRINT THIS RECIPE!

Roasted Beet & Brown Butter Pasta
Adapted from Epicurious

Makes 4 generous servings

1 pound red beets, scrubbed and greens removed
1 pound fresh fettuccine (I made my own from this recipe, but store-bought would work too)
6 Tbsp unsalted butter
1 Tbsp poppy seeds, heaping
1 tsp kosher salt
1/4 cup reserved pasta water
4 oz goat cheese

Preheat oven to 400F.  Wrap the beets in tin foil and place on a baking sheet.  Bake for 1 hour 15 minutes, or until the beets are tender when pierced with a fork.  Set aside to cool.

Once the beets have cooled, rub the skin off and roughly chop.  Place beets in a food processor and pulse until very finely chopped. 

Fill a large pot with water and bring to a boil for the pasta.  When the water boils, add the pasta and cook for 3-5 minutes or until cooked through.  Drain the pasta reserving 1/4 cup of the pasta water for the sauce.

Meanwhile, add butter to a large skillet on medium-high heat.  When the butter has melted and is starting to brown add the poppy seeds.  Continue cooking until the butter is a deep golden brown color.  Once this happens, quickly add the pureed beets, reserved pasta water and salt, stirring to combine.  Add the cooked pasta to the skillet and cook until heated through and the sauce covers the pasta uniformly.

Serve topped with crumbled goat cheese and then...

EAT IT!

Sunday, February 5, 2012

Deep Dish Corn Bread


Corn bread has always been a very ho-hum kind of side to me.  Usually I'll skip it to save the calories for a more delectable treat, like say, cookies or chips or anything else.  More often than not it is dry and crumbly and lacking in the flavor department.  Bo-ring!

We had some friends over for chili a few weeks ago and I decided it was time to find a winner corn bread recipe.  You know, so they didn't stare at me with that blank look in their eyes when I said "there's no corn bread."  I've gotten this look before, and I don't like it.  Regardless of how I feel about corn bread, it appears that most people think that having corn bread is non-negotiable when it comes to chili.  Fine, I'll play that game.  Bring it.

Mace bought me the Tassajara Bread Book for Christmas this year and if you've never checked this one out, I highly recommend it.  The recipes are easy to follow and unbelievably good.  The cornbread recipe I found in this book was moist, it wasn't overly sweet and it was all gone by the end of the night.  An entire 9" spring form pan worth, between 4 people.  I'd say this one's a winner.


PRINT THIS RECIPE!
Deep Dish Cornbread
Adapted from Tassajara Bread Book

8 servings (or 4 very large servings)
1 cup coarse-ground cornmeal
1/2 cup whole wheat flour
1/2 cup all-purpose flour
1/4 wheat germ
2 tsp baking powder
1 tsp kosher salt
2 eggs
1/4 cup honey
1/4 cup melted butter
3 cups low-fat buttermilk
Honey, for serving

Preheat oven to 350F.  Grease a 9" springform pan and set aside.

Combine cornmeal, flours, wheat germ, baking powder and salt in a medium bowl.  In a separate bowl, combine eggs, honey, butter and buttermilk.  Mix the wet ingredients into the dry ingredients.  The batter will be very liquidy.

Pour the batter into the prepared springform pan and bake for 45 minutes, or until the top springs back when lightly touched.

Allow to cool on a wire rack.  Remove the ring from the pan and cut into wedges.  Serve with butter and a drizzle of honey and then...

Eat it!!

Wednesday, February 1, 2012

Potato Soup in a Bread Bowl


Let's have a conversation about comfort food.  You know, the food you go to when its cold and blustery and the winter blues have settled themselves firmly on your mood for a good long visit. Oh, those blues have set in here, and with it, a whopping two feet of snow.  And a hankering for some good old comfort food.


I have lots of comfort foods, but I think I can easily say that cheese, bread and potatoes are always at the center of my cravings.  I'll be honest, potatoes are at the heart of every craving I have.  But, if you add bread and cheese to the mix I will whoop and holler and whatever drove me to needing that comfort food in the first place will be fast forgotten.

So, when the snow set in that closed schools in Montana for two days, I turned to the kitchen. Where else would I turn when its a billion degrees below zero and driving anywhere would be certain death?  Okay okay, maybe I am being dramatic.  The snow was cozy, but it was also the perfect excuse to get my comfort food groove on.   That brings me to this: cheesy rosemary potato soup. In bread bowls.  Mmm hmm....


**Even though I swore this wouldn't happen, I almost always mix and knead my bread dough in my KitchenAid mixer (unless I'm angry and need to knead out some anger).  Any of my bread recipes can just as easily be kneaded by hand without a stand mixer**

PRINT THESE RECIPES!!

Bread Bowls
Adapted from Mel's Kitchen Cafe

1 1/2 Tbsp active dry yeast
1/2 tsp sugar
2 1/2 cups warm water (105-110 degrees)
2 teaspoons kosher salt
2 Tbsp canola oil
7 cups all-purpose flour

Dissolve yeast & sugar in warm water in the bowl of a stand mixer fitted with a dough hook. Allow to sit 10 minutes or until bubbly.  Add salt, oil and 4 cups of flour.  Knead on medium speed, adding the 3 remaining cups of flour as necessary, until a smooth elastic dough has formed.

Put the dough in a well-oiled bowl and lightly coat the top of the dough with oil.  Cover with plastic wrap and allow to rise in a warm place for 45 minutes, or until doubled in size.

Preheat oven to 400F.  Punch down dough.  Cut dough into 8 equal portions and shape into balls. Place on a parchment lined baking sheet, cover with plastic wrap, and allow to rise for 30 minutes or until doubled in size.  Bake for 15-18 minutes or until browned on the top.  Move to a wire cooking rack and allow to cool completely.

To make bowls, just before serving, using a serrated knife cut inward at an angle around the top of the bread.  Pull the top off and then scoop the middle of the bread out (go ahead and eat this bread, you don't need it for the bowls).  Ladle soup into bowls and...Eat it!!


Rosemary Potato Soup
Adapted from Two Peas and Their Pod

1 Tbsp olive oil
1 cup onion, chopped
3 garlic cloves, minced
2 pounds russet potatoes
4 cups vegetable broth
3 Tbsp unsalted butter
3 Tbsp flour
1 1/2 cups whole milk
6 oz feta cheese, crumbled, plus extra for garnish
1 tbsp chopped fresh rosemary, plus extra for garnish
Salt and pepper to taste

Heat olive oil in a large stockpot over medium heat.  Add onion and garlic and saute for 5 minutes, or until onion is tender.  Add potatoes and broth and bring to a boil.  Simmer for 20 minutes or until potatoes are tender when pierced with a fork.  Remove 2 cups of the potatoes from the pot (using a slotted spoon or small mesh strainer) and set aside.  Puree the remaining potato mixture with an immersion blender or food processor. 

In a small sauce pan, melt butter over medium heat and then add flour.  Cook for 3-4 minutes or until browned.  Add milk to flour mixture, whisking constantly, and heat until thick and just boiling. 

Slowly add the milk to the potato mixture and bring to a boil.  Add reserved potatoes and then remove from heat.  Stir in feta, rosemary, salt and pepper.

Ladle soup into bread bowls, top with feta and rosemary and...

Eat it!!

Sunday, January 29, 2012

Roasted Brussels Sprouts


Remember when you were a kid and you hated Brussels sprouts?  Oh, did I hate them.  I am pretty sure every kid hates Brussels sprouts, and I fully expect Anna to follow suit.  But, if she doesn't, I am pretty sure it'll be because I got these crunchy roasted little morsels to her mouth before someone could ruin it for her by steaming them into a wilty soppy mess and presenting them to her as a vegetable.  Until two weeks ago, I truly thought I hated Brussels sprouts.  I haven't let one come anywhere near this mouth since I was a kid. 

But, I truly believe that sometimes food chooses me.  I find myself cooking in the kitchen and I think did I really pick this?  And then I am amazed and my life is changed.  Brussels sprouts are definitely one of those foods that picked me.  Thank you so much Brussels sprouts.  I am sorry for all my years of disdain and snobbery.  You did not deserve that.

I fell in love with Brussels sprouts so hard and fast that I have gone through 4 pounds of them in two weeks.  Not kiddin'.  I have dressed them up with brown butter, with a sprinkling of parmesan, with garlic and onions.  But, truly, these darling itty bitty cabbages are my favorite with a little olive oil and some salt and pepper.  They are so perfect they need nothing more.


Roasted Brussels Sprouts

Ingredients


Brussels Sprouts, halved or quartered into bite sized pieces
Olive Oil
Salt & Pepper, to taste

Preheat the oven to 425F.  Toss the Brussels Sprouts lightly in oil, then season with salt & pepper.  Put in a single layer on a metal baking sheet and roast for 15-20 minutes or until they are lightly browned and a little crispy on the edges. 

Remove from the oven and...

Eat it!!

Thursday, January 26, 2012

Surprise!!

Oh, how I love surprises.  I love being surprised.  But, even more than that, I love surprising!  I'd say its along the same lines as the old adage "giving is better than receiving."  Its hard to pull off a real genuine surprise these days, but I did it.  We did it.  My sister and I surprised my Momma with a visit from Anna and me this past weekend.

The story goes like this...My mom had plans to visit Tessa in San Francisco over her birthday this past weekend.  A week before, and half a bottle of wine into a date night, I proposed my crazy idea to my fantastic husband, and he said "GO!".  So, when we got home that night I booked my ticket and then emailed my sister to see if we could crash their weekend.  Backwards I know, but who could say no to this face?


Psst...Maggie!  Quit showing off your kid and get back to the story!

Tessa was all sneaky-ninja-like and told my mom that she had to pick a co-worker up from the airport to get her there.  When I walked through the doors I saw my mom staring with this confused look on her face.  Here's what she was saying:

"Does your friend look like Maggie?" and
"Your friend looks exactly like Maggie!" and finally
"Is that Maggie?"

And then the screaming.  Screaming and smiling and hugging and screaming.  It was perfect.

Moments after the big surprise!
The whole weekend was perfect.  It was filled with love and hugs and snuggles and stories and laughing and food.

I raved about my love of the Ferry Building on my last trip to San Francisco in November.  But this time was even better.  We went on Saturday morning.  Saturday morning equals Ah-Mazing Market!  Gorgeous food.  If I lived anywhere near this market I would be dead broke all the time.


I was able to find all the ingredients for the Spinach, Mushroom and Goat Cheese Tart that I recently made and Saturday night's dinner was born.  And it was a hit.

The sun was shining that morning and we had a delightful breakfast on the pier while Anna took a nap.


Sunday we did a lot of San Franciscan things like: eating sour dough bread at Boudin, gazing at the Golden Gate, getting soaked at Fort Funston, avoiding hang gliders and snuggling Anna.


And then, just like that!  The weekend was over.  It was a quick trip, but every single moment was enjoyed.  Every single moment is ingrained on my heart.  My family fills my heart, and right now my saucer is full. 

Monday, January 16, 2012

Holy Moly Guacamole!


Remember when I taught you how to create these two beautiful avocado halves?  Now I am going to teach you how to make the best guacamole in the whole wide world (according to Mr. Mace) using these little beauties.  You're so lucky.


I truly believe my secret to this guacamole is simply omitting the lime juice.  GASP!  I know, I know.  But lime juice keeps it from turning brown!  I hear you whining.  And I don't care.  How can I be so insensitive?

You don't see this girl complaining, do you?

I have faith.  I have faith that you will will cross-over to the non-lime-juice-dark-side.  And this is why: there won't be any leftovers to turn brown.  Oh yeah, and who cares if it turns brown?  It won't kill you to eat brown guacamole.  It still tastes good, its just brown.  So, give it some love, give it a good stir to hide the brown and then - wah-la!  Beautiful again. 

This guacamole doubles, triples, quadruples...very easily so its great for parties.  Use avocados that are slightly soft when pressed with your finger, but not mushy.  Oh...you're gonna love this.  Enjoy!


Good Old Guacamole (without the twist)

1 Avocado, halved, pitted and roughly chopped
Handful Onion, chopped
1 Garlic Clove
Sprinkle of Garlic Powder, to taste
Salt, to taste
Handful Tomato, chopped

Mash the avocado with a fork until your desired consistency for guacamole.  Stir in onion, garlic, garlic powder and salt.  At this point, taste the guacamole and season to your liking.

Gently stir in the tomatoes and...

Eat it!

Friday, January 13, 2012

Kitchie Tip: How to Pit an Avocado

Pitting avocados used to drive me totally bonkers.  I would lovingly cut an avocado in half to find two beautiful halves staring up at me...and then I would destroy the half with the pit.  I'd claw at that pit, or take a spoon or a fork to it, trying to relieve it of its duty in the center of that avocado.  Always, I would end up with a great big mess, avocado under my finger nails and a large portion of the avocado in a weepy mess next to its perfect other half. 

My friend Jasper witnessed this horrific scene one day while I was preparing dinner.  He took the avocado from my hand and showed me this little dandy of a trick.  Another "duh!" moment in my cooking life.

How to: Pit an Avocado

First, slice the avocado lengthwise.  Twist the two halves in opposite directions and then pull them apart.  You will have two lovely halves.

Now comes the fun part.  Take a knife and smack it into the center of that avocado pit, like so:


Once you have the knife firmly in the center of the pit, give the knife a turn:


The turn is enough to remove the pit from its stronghold and you can easily lift the knife and pull the avocado pit out.  Hooray!  You have two beautiful avocado halves!


I'll share my guacamole recipe with you soon.  My husband drools over this and says nobody makes it as good as me.  Thanks darlin', not that you're prejudiced or anything, but I happen to think its pretty darn good too!  Stay tuned...