Showing posts with label Beans. Show all posts

Monday, February 4, 2013

Curried Cous Cous Salad with Chicken & Apple


Children, without a doubt, model their parent's behaviors, both good and bad.  Therefore, I firmly believe that if I take care of myself, my children are bound to follow.  We generally eat pretty healthy in our house, but I have been making an effort to kick it up a notch post-baby to get my body back in shape and keep my energy level up.  Two things I have done recently is joining the YMCA and cooking quick, healthy meals every night that both satisfy and taste delicious.

With these small changes, the baby weight is starting to shed itself and my energy level is back to a place that doesn't make the demands of a toddler and newborn unbearable. (It also helps that Claire, has been a pretty good sleeper.  So, the sleep deprivation is minimal compared to my first newborn experience...which was sleep deprivation hell!)

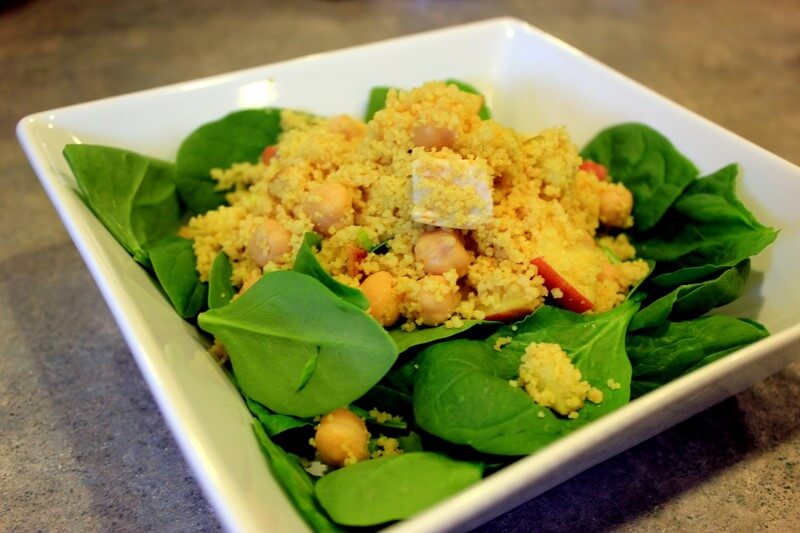
This cous cous salad has quickly become a new staple in our household.  It literally comes together in 15 minutes and it is crazy delicious and packed with nutrition.  I serve it warm the first night I make it, but is great cold out of the fridge the next day too.


Curried Cous Cous Salad with Chicken & Apple
Adapted from Weight Watchers

Serves 6

1 1/2 cups water
1 1/2 teaspoons curry powder
1 teaspoon kosher salt
1 cup plain cous cous
1 (15 1/2 oz) can chickpeas, drained and rinsed
1 red apple, unpeeled, cored and diced
1 cup chicken breast, chopped, from a rotisserie chicken
2 green onions, sliced
3 tablespoons lemon juice
1 tablespoon olive oil
6 ounces spinach

Bring the water, 1 teaspoon curry powder and 1/2 teaspoon salt to a boil in a medium saucepan. Add the cous cous, cover and remove from the heat.  Allow to stand for 5 minutes, until all the water is absorbed and then fluff the cous cous with a fork.

Meanwhile, in a large bowl combine the chickpeas, apple, chicken, green onions, lemon juice, olive oil, remaining 1/2 teaspoon curry and remaining 1/2 teaspoon salt.  Add the cous cous and stir to mix.  Divide the spinach among 6 bowls and top with the cous cous mixture.  Then hurry up and...

EAT IT!!

Saturday, November 5, 2011

Black Bean Burgers


This meal knocked my socks off.  I have tried so hard to like black bean burgers for years.  You know, they're what vegetarians are supposed to eat, and therefore I should really dig these things.  Yet, everytime I try one again I am disappointed.  Usually they are dry, tasteless, boring, and they fall apart so it makes them almost impossible to eat.  But not these.  No, these were moist, they were bursting at the seams with flavor and they were as far from boring you can get.  Plus, they (mostly) stayed together and were way less annoying to eat than traditional black bean burgers.

I never would have tried another black bean burger recipe after several failed attempts.  So, when I showed up to my monthly cooking group, Bitchin' Kitchen, and this was the recipe we were going to make you can imagine my disappointment.  And then utter amazement ensued when these things actually tasted good!  Thanks for finding a winner Jen! 

We made a few changes to the original recipe, like swapping out ground oatmeal for bread crumbs to make this recipe gluten free.  And also I added more garlic, sweet chili sauce instead of spicy and used a red bell pepper to add some color.


This is a food processor meal.  You could theoretically make it by hand but it wouldn't be the quick meal that it is to throw together.  Have I ever told you how much I love my food processor?  It rocks my world on a daily basis.  How people ever lived without these precious things I do not know.

 This is a meal that you can make ahead of time and then throw everything in the oven 30 minutes before its time to eat. I made this whole meal yesterday afternoon (including the buns, which I'll get to in another post after a few tweaks) and then went to have some fun with some friends. We descended upon my house afterwards and all I had to do was turn on the oven and kick back and have a beer while we waited for dinner. My favorite kind of dinner party.


Oh, yeah, and the sweet potato fries.  Easy peasy.  I have been making these about three nights a week for dinner since I mastered them, thanks to Baking Jen's Blog!

Enjoy!

Black Bean Burgers


Makes 10 servings

Ingredients

1 cup dried oats
1 red bell pepper, cut into chunks
1/2 onion, cut into chunks
8 cloves garlic, peeled and smashed
2 (15.5 oz) cans black beans, drained and rinsed
2 eggs
2 tbsp chili powder
2 tbsp ground cumin
1 tbsp sweet chili sauce
Fixings - avocado, tomato, onion

Directions

Pulse oats in food processor until finely ground and set aside. 

Pulse bell pepper, onion and garlic in food processor until finely chopped.  Add black beans and pulse until thick and pasty.  Scrape black bean mixture into a large bowl. 

In a small bowl combine eggs, spices and chili sauce. Add egg mixture to bean mixture and stir well.  Add ground oats and stir well.  Put in refrigerator for at least 20 minutes.  This will allow the mixture to firm up enough to form into patties. 

Preheat oven to 375F.  Line a baking sheet with tin foil and spray with cooking spray.  Form the bean mixture into 10 patties and place on baking sheet.  Bake the bean patties for 20 minutes, flipping them after 10 minutes.

Serve the burgers with avocado, tomato and onion on a bun.

Eat it!


Sunday, September 18, 2011

Falafel & Pita Bread


OH. MY. WORD.  I cannot believe my luck in stumbling upon this recipe.  This is far and away one of the best meals I have ever made!  Wowza!  I can't even begin to describe the party that ensued in my mouth after the first bite...crisp on the outside, soft in the middle.  Perfection.


The thing is, I was in a foul foul mood when I started cooking this meal.  Anna had refused to sleep the night before, I have a cold, it was a busy busy day.  I wanted to plunk on the couch, watch a movie and whine.  But, as usual, cooking worked its magic and energized me.  I started kneading the dough, pulsing my food processor, and suddenly I was singing and dancing around the kitchen.  Brother forming falafel balls behind me and Anna tugging at my apron. 


This wasn't a difficult meal to make, but you do need to have some forethought in planning it.  You need to soak the beans overnight and the pita bread needs a good two hours to rise.  So, this is a good weekend project if you are going to make it all fresh.  Alternately, the pitas would freeze well and you could have them on hand and pull them out in the morning.  I think the falafel would freeze well too, but haven't tried it yet.  I'll let you know if I do.  See note below in recipe...these DO freeze well!  Fried right out of the freezer.

According to Reeni, of Cinnamon Girl, do not even bother with canned beans.  Its dried beans ,or bust!  I didn't contemplate it for even a second after her tirade against canned beans and her mention of several failed attempts.  I will learn from her mistakes here and save myself the pain.

The falafel are deep fried, but don't let this deter you from making this recipe.  The key to deep frying is keeping the oil hot enough (350-375 degrees) that things don't get soggy and absorb too much oil, so a thermometer is a must.  And also, a deepish pot (not a skillet) is essential so the oil doesn't spatter.  It's easy though, I promise!!  You just have to give is a little love.  Awww...


Its really important to have good helpers too, to direct you along the way!


Falafel & Tzatziki

Adapted from Saveur & Cinnamon Girl

Ingredients

Tzatziki:
2 cloves garlic, finely chopped

1 cucumber peeled, seeded and chopped
1/2 cup finely chopped flat-leaf parsley
1 Tbsp fresh lemon juice

1 Tbsp fresh dill
1 cup Greek yogurt
Salt, to taste

Falafel:
1 1/2 cups dried chickpeas
1 cup roughly chopped flat-leaf parsley
1 tsp flour
1 tsp ground coriander
1 1/2 tsp ground cumin (I love me some cumin, so adjust accordingly if you don't)
3 cloves garlic, roughly chopped
1 small red onion, roughly chopped
Salt, to taste
Canola oil, for frying
Warm pita, for serving (recipe below)


Directions

Make the sauce: Place all ingredients in a food processor except the yogurt.  Pulse until smooth.  Add yogurt and pulse until just combined.  Don't overdo it, or the sauce will get too runny (trust me, I know).

Make the falafel: In a medium bowl soak chickpeas in cold water overnight (8+ hours). Drain water and place chickpeas in a food processor with parsley, flour, coriander, cumin, garlic and onions. Pulse mixture until it is well combined but still coarse in texture.  Salt to taste. Chill in freezer for 30 minutes. Use a spoon to portion the mixture into 2-inch balls. *Make Ahead instructions below.
Pour 2" oil into a heavy sauce pan and heat over medium-high heat until a thermometer reads 350˚. Working in batches, fry falafel balls, turning occasionally, until they float and turn golden brown, about 2-3 minutes. Using a slotted spoon, transfer falafel to a rack set over a rimmed baking sheet. Before frying the next batch make sure your oil is back up to 350˚.


Serve in pita with the tzatziki sauce. This is also good with feta, tomatoes and lettuce for fixings.


*MAKE AHEAD:  At this point, put falafel balls on freezer-safe tray lined with parchment paper and freeze at least 3 hours.  Once frozen put in a freezer-safe container and store for up to 2 months.  When you are ready to use follow frying instructions above and you have a delicious homemade meal!


Pita Bread


Adapted from Cinnamon Girl


Ingredients
1 teaspoon active dry yeast
3 ½ cups flour
1 tablespoon sugar
2 teaspoons kosher salt
2 tablespoons olive oil


Directions

Stir together yeast and 1¼ cups warm water in the bowl of a stand mixer fited with dough hook attachment, and let sit until foamy, about 10 minutes. Whisk flour, sugar, and salt in a large bowl.  Add oil to yeast and then add flour mixture.  Knead on medium speed until smooth, about 5 minutes. Transfer to an oiled bowl and cover with plastic wrap; let sit until doubled in size, about 2 hours.

Punch down dough and divide into 8 equal pieces, knead each into a ball. Place balls on a floured surface, lightly spray with cooking oil and cover with plastic wrap. Allow to rise for 30 minutes.

Heat a 12″ skillet over medium-high heat. Working with 1 ball of dough at a time, transfer to a work surface and roll into a 6-7″ circle, brush with oil and add to skillet, oiled side down, brush top with oil. Cook, turning once, until browned and cooked through, 2–3 minutes.  *Make Ahead instructions below.

Eat
it!!


*MAKE AHEAD: Allow pita bread to cool and then put into freezer bag or other freezer-safe container and store up to two months.  When you are ready to use, take them out of the freezer and allow to thaw at room temperature for at least 3 hours.