Showing posts with label Cake. Show all posts

Monday, July 2, 2012

Camouflage Cake


My dear friend Ashley got married about a month ago (you know the one who's shower I turned into Foodzilla while planning?) to a man made perfectly for her.  This wedding was positively oozing with love, good vibes, and the absolute knowledge that this was a marriage made to last.

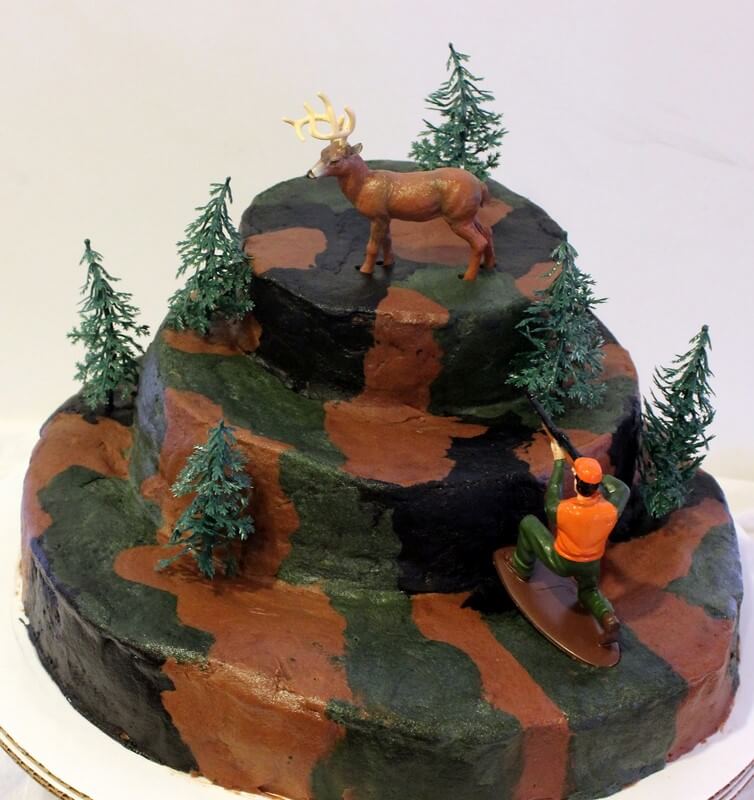
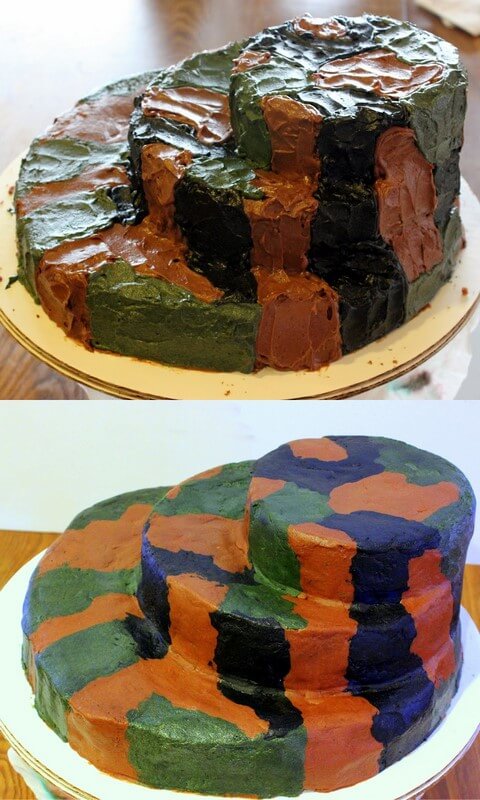
As all good brides do, Ashley put a ton of time, energy and forethought into exactly how she wanted their big day to be executed.  One of these details was in the form of a groom's cake for her beloved.  Since the groom is an avid hunter she encouraged him to put bits of camouflage into the decor of their wedding, but each time he shied away from it.  Little did he know she had a major camo surprise planned for him, and she asked me to make it for him.  A camouflage cake!


GULP.  I mean, this was my wedding cake debut!  And it was for one of my dear friends' wedding no less.  Oh yeah, and besides the occasional birthday cake for a friend's birthday, I don't really have much cake decorating experience.  But I was up for the task...and I think I did alright.


I was a little intimidated and did crazy amounts of research and several renditions of this cake before the big day.  After my obsessive research (and a miserable attempt at camo fondant) I decided to use the VIVA paper towel method (great video tutorial here) for smoothing the icing.

For this method you need to use a crusting buttercream recipe, the one I used is below, and a roll of VIVA paper towels.  Why VIVA?  Because they do not have a pattern on them and are perfectly smooth.  I started by piping the design for the camouflage pattern onto the cake.  Then, I put the whole cake in the fridge for about an hour for the frosting to set up, or crust.  You will know that your frosting has crusted when you touch the frosting with your finger and it doesn't leave any on your finger.  It should feel slightly stiff  but it won't be hard.

Once the frosting had crusted I used a VIVA paper towel and laid it over the top of the cake and very lightly smoothed it with my finger.  (Some people use an offset spatula, but I found that my finger left a smoother finish because I could feel the bumps and lumps beneath the paper towel.)  I repeated this method working from the top to the bottom of the cake and then around the sides.  It took awhile to get the smoothness I desired, but it worked!  Don't believe it?  I didn't either at first.  Here's proof:


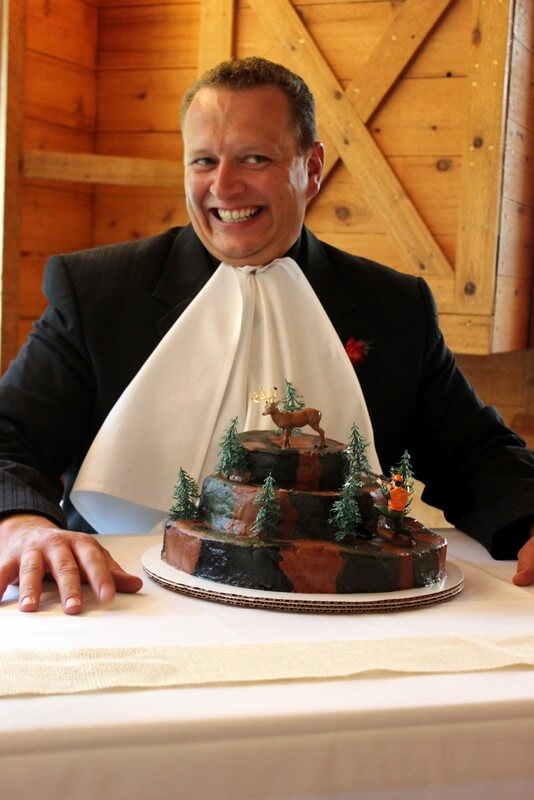
I was thrilled with how the cake turned out, and clearly, so was the groom!


Chocolate Crusting Buttercream Icing
Adapted from Cake Central

Makes enough to frost 2 - 8" cakes

1 cup unsalted butter, softened
1 cup Crisco all-vegetable shortening
1 tablespoon pure vanilla extract
1/4 teaspoon kosher salt
2 pounds (8 cups) powdered sugar
1 cup unsweetened cocoa
1/2 cup heavy whipping cream

*Variation: to make a vanilla buttercream I omitted the cocoa powder.

In the bowl of a stand mixer (or with a handheld mixer) cream the butter, shortening, vanilla and salt until smooth and no lumps remain.

In a separate bowl, sift together the powdered sugar and cocoa.  Alternately, you can pulse 1/3 of each at a time in a food processor to sift and combine.

Add 1/3 of the powdered sugar mixture to the butter mixture and beat on medium-low until combined.  Add 3 tablespoons of the cream and mix on low until combined.  Repeat with remaining powdered sugar and cream until desired consistency and sweetness is attained (you may not need all of the powdered sugar and cream, this makes a very very sweet icing).

If you want to color the icing, do this after your desired consistency is reached.  Then add a few drops of dye at a time until the icing is the color you desire, keeping in mind that it will be slightly darker once it has crusted.

If you are not using the icing right away cover with a damp paper towel and put in the fridge.  When you are ready to use it whip it with your mixer for one minute.

Ice the cake, smoothing it with an offset spatula as much as possible.  Allow to air dry or put in the fridge for at least 15 minutes.  When the frosting is set (it doesn't come off on your finger when you touch it) you can use the VIVA paper towel method described above to smooth the frosting.  Once you've smoothed the cake, you can add decorations, or you can simply...

EAT IT!!


Wednesday, March 21, 2012

Dark Chocolate Cake with Mocha Buttercream


I have been on a roller coaster of emotions these past few weeks.  If you've been keeping up with my posts, you know that life has had some ups and downs lately.  And these ups and downs have pulled me out of the kitchen and into real life.  This weekend I got to spend hours in the kitchen baking and decorating a cake for a friend's birthday and at the end of it I felt revived and renewed.  After spending hours on my feet I felt energized and truly alive for the first time in weeks.  I feel so fortunate to have something in my life that brings me (and others, for that matter) such joy.  I am breathing in gratefulness this week.  Life is good.  Oh is it good.

And so was this cake.  Actually, this cake was beyond good...it skyrocketed right past good, great, excellent and amazing, and fell unscathed into the lap of perfect.  This cake was all sorts of intense.  Four layers of dark chocolate cake....with layers of bittersweet espresso ganache...and mocha buttercream...topped with toffee and chocolate curls. 


I had an obscene amount of fun making this cake.  I love being challenged with a new recipe.  I love finding recipes with an absurd amount of steps that would have a  non-baker running away in terror.  I love when the end product looks and tastes as amazing as the amount of time I put into it.  Let's just say, this cake fulfilled the baking nerd in me.

I also got to try my hand at making chocolate curls which filled me an irrational amount of giddiness.  The tutorial for the chocolate curls can be found here.  Such a fun easy way to gussy up a cake.

This was a conglomeration of several recipes.  The cake came from my all-time favorite baking book flour by Joanne Chang, the frosting and ganache were adapted from Southern Living and the idea for toffee and chocolate curls came from this little brain of mine.   This is definitely a special occasion cake because it takes some time, but believe me, it is worth every second you put into it. 


PRINT THIS RECIPE!

Dark Chocolate Cake with Mocha Buttercream & Toffee

Dark Chocolate Cake

Note: The cake can be made up to a week ahead of time.  Bake, allow to cool and then wrap tightly in plastic wrap and freeze.  Remove from the freezer about an hour before you are going to frost it.

1/2 cup (60 grams) dutch-processed cocoa
1 ounce (28 grams) unsweetened chocolate, finely chopped
1 cup boiling water
1 3/4 cup + 2 tablespoons (225 grams) cake flour
1/2 teaspoon kosher salt
1 teaspoon baking soda
1 1/2 cups brown sugar, packed
1 cup (2 sticks) unsalted butter, softened and cut into 1-inch pieces
1/4 cup (60 grams) creme fraiche
2 eggs
2 egg yolks

Preheat oven to 350F.  Butter, flour and line the bottoms with parchment paper of two 9-inch cake pans.

Combine cocoa powder and unsweetened chocolate in a small heat-proof bowl.  Pour the boiling water on top and whisk until completely smooth.  Place in the fridge for 45 minutes, whisking every 15 minutes,  until cooled to room temperature.

Combine flour, salt, baking soda and brown sugar in the bowl of a stand mixer fitted with the paddle, and mix until combined.  Add the butter and beat on low speed for 30-40 seconds, or until the mixture resembles a dough and is thoroughly combined.

Whisk the creme fraiche, eggs and yolks in a small bowl.  With the mixer on low, slowly pour the creme fraiche mixture into the dough until thoroughly combined.  Turn the mixer up to medium high and beat for 2 minutes until light and fluffy.  Stop the mixer and scrape down the sides of the bowl, then return the mixer speed to low.  Slowly pour in the cooled chocolate mixture.  Stop the mixer and scrape down the sides of the bowl, then mix on medium for 30-40 seconds until the chocolate is completely incorporated and evenly distributed in the batter. 

Pour the batter into the prepared pans.  Bake 30-40 minutes, or until a toothpick inserted in the middle comes out with just a few crumbs sticking to it.  Allow cakes to cool completely on a wire rack in the pan.  Once cooled, invert the pan on a flat surface and peel off the parchment paper.

Meanwhile....while you are waiting for your cakes to cool.

Mocha Buttercream Frosting

1/2 cup (70 grams) all-purpose flour
3 Tablespoons unsweetened cocoa powder
3 Tablespoons instant espresso powder
1 1/2 cups half-and-half
1 1/2 cups (3 sticks) unsalted butter, softened
1 1/2 cups powdered sugar
2 teaspoons vanilla extract

In a small saucepan, whisk together flour, cocoa, espresso powder and half-and-half.  Whisk constantly over medium heat for approximately 5 minutes or until thickened (it will resemble a pudding).  Transfer to a small bowl and cover the surface with plastic wrap to avoid forming a skin.  Set aside and allow to cool to room temperature, about 45 minutes.

When the mixture has cooled, beat butter and powdered sugar in a stand mixture fitted with the paddle attachment, until light and fluffy, about 4 minutes.  Slowly add the cooled cocoa mixture on low speed until thoroughly combined.  Add vanilla and beat on low for 20 seconds to combine. At this point the mixture should resemble whipped cream (dreamy creamy mocha whipped cream!).

While you're waiting for the buttercream to cool do this...

Dark Chocolate Espresso Ganache

2 tablespoons espresso powder
1 teaspoon granulated sugar
1/4 cup hot water
12 ounces dark or bittersweet chocolate, finely chopped
1 1/4 cups heavy cream
1 tablespoon butter

In a small bowl, combine the espresso powder and sugar.  Add hot water and stir to combine.  Set aside.

In a small saucepan, heat the cream over medium heat until just boiling, then quickly remove from the heat.  Pour the cream over the chocolate in a bowl and whisk until smooth and no chocolate chunks remain.  Stir in the butter and 3 tablespoons of the espresso mixture.  (The rest of the espresso mixture can be discarded.)

Allow ganache to stand at room temperature for 1 hour or until it is thick enough to spread.

Decorations

2 Heath bars, coarsley chopped
Chocolate Curls

Assembly

Simple Syrup - boil 1/2 cup sugar & 1/2 cup water for 2 minutes (the simple syrup isn't completely necessary, but I find it adds a lot of moisture to my cakes and is a simple way to really amp up the cake)

Note on cutting cake layers: There are definitely different camps on this, but I like to freeze my cakes for 20 minutes before cutting them.  Because the cake is firmer, I find it easier to work with and much easier to cut into layers. 

Cut each cake in half lengthwise so that you have 4 layers.  Put your first layer on a cake stand and brush generously with simple syrup.  And add enough ganache to thinly cover the top of the cake.  Next add 1/3 of the mocha buttercream on top of the ganache and gently spread to cover the top of the cake.  Repeat these steps two more times and end with an unfrosted cake layer on top, brushed with simple syrup.

Add several large dollops of the remaining ganache to the top of the cake and spread with an offset spatula on the top and down the sides of the cake.  Continue adding small dollops of ganache to the cake until the top and sides are completely covered with ganache.


Now, this next part is up to you and how perfectionistic you are.  Smooth the sides of the cake with an offset spatula until desired smoothness is acheived.  You can spend a lot of time on this, so get it as smooth as you can tolerate, and then move on.  See Exhibit A...not perfect, but it'll do.

This is Exhibit A.

Now, toss a bunch of Heath on the top and wherever else you want to put it (try to stop yourself from putting it in your mouth, you'll get plenty of that later!).  Decorate with chocolate curls and finally...finally...you get to...

Eat it!!!

Tuesday, December 13, 2011

Champagne Cake Balls


I have made 100 cake balls in the last 4 days. 100.  You know, for a girl who doesn't like cake, I sure bake a lot of cake.  Although, it turns out that its that ooey gooey pasty icky store bought cake I don't like.  And all this time I thought it was cake I didn't like...but it turns out its just the source.  Sorry cake for hatin' on you all these years!  Can we be friends?

We had another GNIPL on Friday evening and I deemed a theme for the evening.  Appetizers!  Yeah, so why not cake balls?  That's a tasty appetizer.  Okay, okay, I made an appetizer that I will share with you all soon, because it was awesome.  But, I also made these cute little cake balls, and since I got so many requests for this recipe on Friday night I thought I'd post it first.  You know that old saying, "Life's unexpexted, eat dessert first"?  That applies to blog posts and baking recipes too.  I'm surprised you didn't know that.

I had a taste tester...

I got this recipe from Laura at Sprint 2 the Table and made some adaptations to suit my tastes.  Her review was that these were a very doughy cake ball and I wanted something a little more cakey.  So, I added egg whites and oil to acheive this result. 


Besides the final product, the very best part of making these cake balls is the leftover champgne.  One generous glass to be exact.  That I am drinking right now.  While munching on a cake ball.

These were a hit!  I hope you enjoy them as much as me and my little cake monster did!


Champagne Cake Balls

PRINT THIS RECIPE!!

Makes 30 cake balls

Cake Ingredients:
1 box white cake mix
1 1/4 cups champagne (I used medium-dry)
3 egg whites
1/3 cup canola oil

Frosting Ingredients:
1/2 cup + 1 tbsp champagne
1 stick unsalted butter, at room temperature
1 1/2 cups (165 grams) powdered sugar

Candy Coating:
1 pound white or bittersweet chocolate (or both)


Preheat oven to 350F.  Grease a 9 x 13 pan with butter or cooking spray and set aside.

To make the cake, combine all cake ingredients and beat with an electric or stand mixer until well combined, about 2 minutes.  Pour the cake batter into the prepared pan and bake for 20-25 minutes or until a toothpick inserted in the middle comes out clean.  Set on a cooling rack and allow to cool completely.

To make the frosting, bring 1/2 cup champagne to a boil and then reduce to a simmer until it is reduced to 2 tbsp, about 10 minutes.  Allow to cool completely (I made the cake and the champagne reduction and, to allow adequate cooling time, moved onto the rest of the recipe the next day).

Add butter and powdered sugar to the bowl of a stand mixer and beat on medium speed until light and fluffy, about 4 minutes.  Reduce speed to low and slowly add the cooled champagne reduction and 1 tbsp champagne.  Increase speed to medium and beat for one minute or until well combined.

In a large bowl, crumble the cake and then add 1/2 cup of frosting.  Using your hands, incorporate the frosting into the cake until well combined.  If the cake seems dry keep adding frosting 1 tbsp at a time, up to an additional 1/4 cup, until it reaches your desired consistency (you can do some taste tests here until the taste suits you).

Using your hands, roll the cake mixture into 1 tbsp sized balls and place on a cookie sheet lined with wax paper.  Refrigerate for 1 hour or freeze for 20 minutes to firm up cake balls.

In a microwave safe bowl melt the chocolate in 30 second increments, stirring in between until almost melted.  Stir vigorously and if the chocolate is still not melted, microwave in 15 second increments until melted and smooth.

Using a spoon, take one chilled cake ball at a time and place in the melted chocolate.  Spoon chocolate over the cake ball to coat.  (Don't roll the cake ball in the chocolate or you will create crumbs that don't look pretty on your final product.)  Remove cake ball from the chocolate with spoon and very gently return to wax paper on the cookie sheet.  Repeat with remaining cake balls.

Allow to chill in the refrigerator for 1 hour and then...

Eat it!!

Sunday, October 2, 2011

Pirates!


"So, do you want me to make a cake for Luca's birthday party?" -Me
"Sure!" -Danesa
"What kind of cake should I make?"
"Something like a skull and cross bones."
"Um, I meant what flavor..."
"Oh, doesn't matter, but lots of frosting.  And a skull and cross bones."
"Okay...I'll, uh, work on that."

I was scared.  I love making cakes.  I love trying new recipes, new frostings. But...I am not much of a cake decorator.  The extent of my cake decorating is seeing just how smooth I can get the frosting on the sides of the cake and then maybe putting another little poof of frosting on top.  Fancy.  Yeah.

Don't get me wrong, ever since I saw Cake Boss I have been dying to get my hands on some fondant, but, I do not think of myself as a creative person.  So the thought of rolling out dough-like frosting and turning it into something super cool and artsy has intimidated the living hell out of me.  So, instead I have just had a wild crush on it.  A crush I am too scared to approach and actually talk to.  I have just admired this fondant from afar, hoping someday I have the nerve to go say hello.  Saturday was that day.

To prepare myself for this adventure I went to Michael's and perused their baking aisles; which means I threw every single thing that looked interesting into my cart and bought it.  Hey, if I am going to do this, I am going to do it big! 

I settled on black frosting dye, white fondant, edible frosting markers, and a felt skeleton mask that I could use as a stencil.  I am happy to report that I used all of it.  I will skip the gory details of assembling the cake and skip right to the fun stuff...


I rolled the fondant out on a counter dusted with powdered sugar and then traced the skeleton mask on the fondant with edible markers.  I then cut everything out with the tip of a sharp knife.  I flipped the skull over so my markings wouldn't show, drew in a few skull cracks, some teeth and -- WA-LA!  A skeleton head!  I just winged the crossbones and drew them free hand.

TA DA!

A happy birthday boy!

I have no idea why I was so scared.  This cake was SO FUN to make.  I'm still not willing to admit yet that I have any creativity in my bones...but I am hoping it will start to creep in, because I could have some fun with this! 

We partied like pirates and had an awesome time.  Happy 4th birthday Mr. Luca!!


Strangely enough, Mace was half way across the country celebrating another pirate birthday with another awesome 4 year old.  Happy #4 to you too Mr. Finn!  Love you to crazy little pieces! 


Does anyone know any good pirate jokes?  I love me a good pirate joke!  Okay, I'll start...(you actually don't want to get me started on pirate jokes because I will not shut up.  But, I will try to behave myself here):

What is a pirate's favorite kind of beer?  PB Arrrrrrgh!
What is a pirate's favorite kind of sock?  Arrrrrghyle!
What does a pirate drive?  A Carrrrrrrrgh!
And on and on...

Hope you had an awesome weekend!  Happy Monday!