Friday, September 30, 2011

Coffee with Anna

Our mornings are usually crazy.  I always wake up too late and then I whirl around the house something like this...Stare at the closet for 11 minutes as I never have any idea what to wear this time of year because it is 37 degrees in the morning and 87 degrees in the afternoon. Beautify.  Which involves putting mascara on with one hand and holding Anna with the other.  Stare blankly at Anna's closet for 11 minutes because of said dilemma above.  Get Anna dressed.  Head downstairs...Crap, I forgot to make coffee last night.  Crap, I forgot to make lunch last night.  Crap, I forgot to pack all Anna's stuff last night.  CRAAAAAAAP!!!  Gotta go!
 
BUT--once in a while, I have my act together.  I finish getting us ready, look at the clock and there are 8 precious minutes before we need to leave the house.  These are my very favorite mornings because then I get to have coffee with Anna.  She is usually milling around by my feet in the kitchen in the mornings and on these rare got-it-together days I pour myself a cup of coffee, plop down beside her on the kitchen floor and we chill.  These are the best mornings, and I savor these minutes we have together before we to dance off to our day.  

Happy Friday out there!

Wednesday, September 28, 2011

Canines and Leftovers

I hear myself whining a lot these days about how bored I am.  Poor poor me.  I find myself staying home a lot because it requires so much energy to pack it all up and get us moving.  I made a conscious decision to fix that this past weekend.  No boredom will occur in our house this weekend, no sir-ee!  But, then my friend Jen invited Anna and I to join her for a fundraising event for the Human Society on Sunday and my immediate thought was: no, too much work.  Then, the more I thought about it during the course of our conversation, the more I knew I would be going on Sunday.  Anna and I love dogs, we love being outdoors and we really love spending time with Jen.  I suddenly couldn't think of a single reason not to go. And I am so glad I went.

The event was the Canine Classic, which took place at Paws Up Ranch, and it was a rockin' time.  I will be going every year from here on out.  This was a running and hiking event and had distances from a two-mile hike to a half-marathon.  We did the two-mile hike because I wasn't sure how the monkey was going to hang in her new pack...but she did all right.


Anna and her many sleep-in-the-pack poses!

 
I hadn't been out to Paws Up before Sunday (particularly because this is an upscale "glamping" resort that specializes in $800+/night tent cabins) and was excited to check it out.  The day was gorgeous, the scenery amazing, and the company the best!

  
After the hike we headed back to the picnic pavillion for a bbq lunch.  Can you believe I didn't even get a picture of the gourmet spread?  Clearly my head was elsewhere.  Like wrangling Miss Thang, who was only interested in hamburgers, canines and eating rocks.

I keep thinking she can't possibly get any cuter, and
then she goes and strikes a pose like this!


The coolest part of the day was seeing how many people came out to support our local Humane Society.  If I remember correctly $15k was raised on Sunday.  Wow.  Missoulians love their animals, so I am not surprised.  But still, pretty awesome.


This was the perfect way to spend our Sunday. We needed a day away from the same old toys, same old living room, same old high chair.  And you know what?  No more excuses not to keep doing stuff like this.  It wasn't dreadful getting out of the house, it just took a little forethought.  


We rounded out our perfect afternoon with a perfect evening.  Leftover pumpkin soup, my friend Jenny and her daughter Chloe and red wine.  Our girls played, we sipped wine and we tried to avoid the fact that Monday was staring us straight in the face.  


I went to bed Sunday night with a full heart, a full belly and with dreams of our next adventures.  No more sitting at home, no more excuses.  Life is so much fuller when you fill it.  And filled it we did this weekend.  To the brim.

Monday, September 26, 2011

Pumpkin Soup and Awesome Peeps

This weekend turned out to be filled with loads of my favorite people.  I was desperately craving a weekend like this and am entering my work week with a full heart and head.  Saturday was filled with mild anxiety in respect to time, due to Anna's nap strike, but I managed to pull off a darn good fall soup that didn't disappoint.

The Khomenko's came over to share this soup and tales of their recent European adventures with me.  I love it when they come over and fill my house with noise and love.  I love taking pictures of Anna hanging with Danesa because they adore one another.  And Luca, in all his awesomeness, loves jumping in on this action too:


Which is doubly awesome because he always finds a way to covertly swipe my camera and I find pictures later that always make me smile.


More in another post on my Sunday at Paws Up for the Canine Classic and leftovers with the Wilsons.  But for now, on to the soup!

My inspiration for the soup was a good lookin' pumpkin and a buttercup squash that I bought at the Farmer's Market a couple weeks back.  As usual, I picked through piles of recipes until I found the very most perfect one.  Soup.  I mean, because who doesn't want a bowl of piping hot soup when its 90 degrees out?  But seriously, if you found a recipe that is finished with ginger infused brown butter, could you resist it for even a second?


This was a fun soup to make because it had so many different flavors and I was curious to see how they would meld themselves together.  Nutmeg and garlic?  Interesting.  Carmelized onions and cardamom?  Wow.  Ginger, brown butter, cloves, sugar, gaaaah...my tastebuds are going crazy just thinking about this.


A word on nutmeg: always use fresh grated.  Always always.  Always. It is so much more delicious, flavorful and amazing than the pre-ground stuff.  Don't argue with me on this one.  You won't win.  Just try it one time and you will never go back.


Ooo...and look how pretty!

I had never cooked with a real live pumpkin before, only the canned stuff, so I was slightly intimidated going into this venture.  You know what?  It's just like carving a jack-o-lantern, but way less annoyng because you just chop that sucker in half and scoop out the seeds.  No creativity involved and you don't get  pumpkin guts up to your armpits when you're scooping the seeds out. 


Another cooking side note.  I am a recent convert to the whole prep bowl phenomenon.  For a really long time I thought they were annoying extra dishes and never bothered with them.  But as time goes on, and I become a little older, and much much wiser, I am seeing the benefit of these beautiful little things.  I am no longer standing over a skillet frantically measuring out spices and panicking that my sauce will burn.  I do this ahead of time in these tiny little adorable bowls and cooking suddenly becomes so much more relaxing.


All right already!  On with the recipe.  Enjoy!

Saturday, September 24, 2011

Moseying

Today was a beautiful day in Missoula.  The kind of fall day that makes you believe that summer really isn't going to end and that snow couldn't possibly fly any day.  This is what I love and hate about Missoula.  It teases and taunts with its indecisive weather.


I remember one homecoming about this time a few years back, when Mace and I were hell-bent on riding our bikes down to the homecoming parade.  We had just moved back to town and were excited to be able to throw back a few drinks and not worry about driving.  So we stuck to this plan, even though it was like 10 below.  Biking around town wasn't as fun as we had remembered it that day.

I had a heck of a time getting Anna to nap today.  I had big big plans to enjoy the morning at the Farmer's Market and then have a leisurely day cooking and baking while Anna napped.  Instead she took three 45 minute naps, during which I whirled around the house in a frenzy trying to get dinner ready for our friends coming over at 5:30.  I decided during one of her nap strikes to hit the reset button on our day and we moseyed on down to the park. 

I say moseyed because this gal was along:


Gretta still gets excited to get out of the house with us, but after about two blocks she puts on the breaks.  She typically spends the next two blocks sniffing  random blades of grass with an amazing fervor so that she does not have to walk at my pace.  Or a snail's pace.  Or any pace.  And when we leave the park to head home she knocks it down another notch, just for fun. 

I believe these walks make Gretta happy, which is why I bring her along even though I know what the outcome will be: 10 minutes to walk four blocks to the park, 20 minutes to walk four blocks home.  It is a test of my patience when I just want to get home to tick off all the really important things on my to-do list...and then I breathe.  I stop and enjoy the sway of Anna on my back pointing at the leaves, the birds, the dogs, the other kids.  I enjoy this time with Gretta and slowly tug her along, scratch her ears and praise her for her great job walking.  I take pictures of me and my lil buddy:


This isn't exactly what I want to be doing at this moment, but I'm trying to make it be.  Because I'm with my baby and I'm with my favorite furry friend and its beautiful outside and I am alive and breathing and happy.  So, yeah, actually its okay that we're moseying. 

Friday, September 23, 2011

Blueberry Scones


I took an amazing 6-week class in the kitchen of Posh Chocolate with owners Ana & Jason Willenbrock this past May.  This class focused on baking and pastries but ended with a bang when we learned about chocolate...tempering, making ganache, making truffles.  Mmm...anyway, I digress as this post is about blueberry scones and not chocolate (get your head out of the gutter Maggie!).  We'll leave the chocolate making for another day.

Ana & Jason both studied at the Harvard of cooking schools, The Culinary Institute of America (CIA), in New York City.  These two are amazing, they know their stuff (maybe because of their time at CIA, but mostly because of their devotion to the profession) and they are the funniest, happiest, rockin-est people I know that own an upscale chocolate shop.  But anyway, that's all to say: I learned a lot from them. 

I adapted this recipe from one we baked in class, and this has been my go-to breakfast when company comes ever since.  These scones are super easy to make, I can bang them out in about 10 minutes, and they are super versatile.  I've made blueberry, raspberry white chocolate, chocolate & cinnamon, chocolate & nutmeg, and chocolate & orange zest.  I have learned that using frozen fruit works much better than fresh.  The fresh fruit tends to get smooshed too much and it doesn't look pretty.  Not to fret though if you have fresh raspberries on hand screaming at you to be thrown into these scones.  Just stick them in the freezer for 15 minutes before you add them to the dough and they'll be good to go.

The most important thing I learned about making scones during this class is to keep the butter cold and don't overwork it.  See, butter is what makes the flaky layers in scones. If you overwork the butter or get it too warn and melt it, you will get a dense ucky yucky so-so pastry, rather than this flaky goodness:


The key to not overworking the dough and compromising your butter is to use a pastry blender.  Alternately, you can use two butter knives or a fork to cut the butter in too...all these fancy schmancy tools aren't a must; they just make things a tad easier and give me an excuse to buy yet another kitchen gadget. 


Another fancy little trick I learned from Ana is to pat the dough out and not roll it.  Like so:


Pat pat pat..

Its all about that pesky butter, and patting keeps the butter in good baking form to create those luscious layers.  Mmm...

Finally, consider parchment paper your new BFF.  Parchment paper knows how to work its stuff.  Or at least keep anything and everything from sticking to your pan and your food.  Parchment paper was originally made by God himself to reduce the frustrations of bakers everywhere.  Pick some up, you won't regret it.

That white stuff under the scones is parchment paper. 
It looks like regular paper, but its actually magic paper.

Blueberry Scones

Ingredients:

1 1/2 cups all-purpose flour
2 tbsp sugar
2 1/4 tsp baking powder
1/4 tsp baking soda
1/2 tsp salt
6 tbsp unsalted butter, very cold
1 large egg yolk
1/4 cup + 2 tbsp buttermilk
1/2 cup frozen blueberries (or other ingredient of choice)
Turbinado sugar, for sprinkling

Directions:

Preheat oven to 425.

Whisk flour, sugar, baking powder, baking soda and salt together in a large bowl.  Cut in the butter until mixture resembles coarse meal.  You can use a pastry cutter for this or use two knives and cut into the butter using a cross-way motion until crumbly.

In another bowl, combine the egg yolk and buttermilk and gently beat.  Add to the flour mixture all at once.  Work quickly and use a wooden spoon or your hands to work the mixture into a soft dough.  Gently knead in blueberries.

Turn the dough onto a lightly floured surface and pat into a disc shape about 3/4" thick.  Sprinkle turbinado on the top and then use a butter knife or pizza cutter to cut into 6 wedges.

Place on a baking sheet lined with parchment paper and bake for 12-15 minutes or until they are golden brown on top.

Eat them while they're hot! 

These also freeze well, so make a double batch to enjoy later.

Wednesday, September 21, 2011

Upside Down Apple Pie


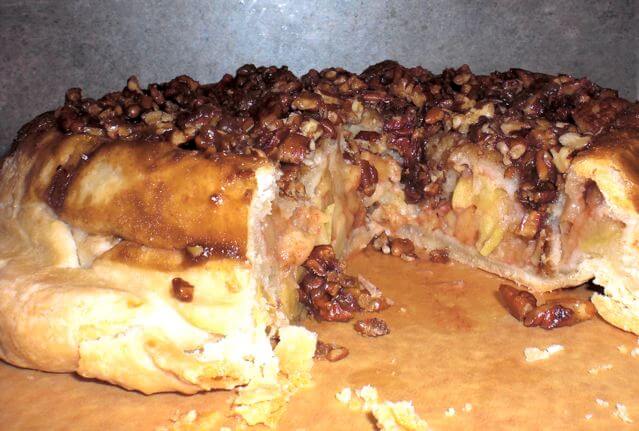
This recipe was like apple pie on steroids.  Or pecan pie on steroids.  I can't decide.  All I know is that when I see a recipe with pecans in it, it absolutely has to be made immediately!  And thank goodness Zachary was in town this weekend to help with the eating part of it, because, like I said, the creation of this pie just couldn't wait.  It was begging to be made.  As it was, we only made it through half this pie in five days, this pie is enormous!  And amazing.  Really really amazing.  And really fun to make.


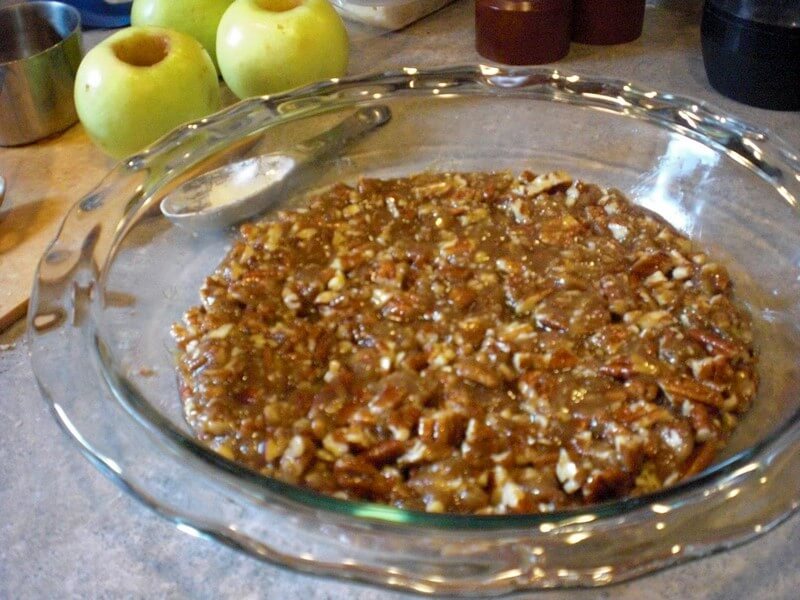
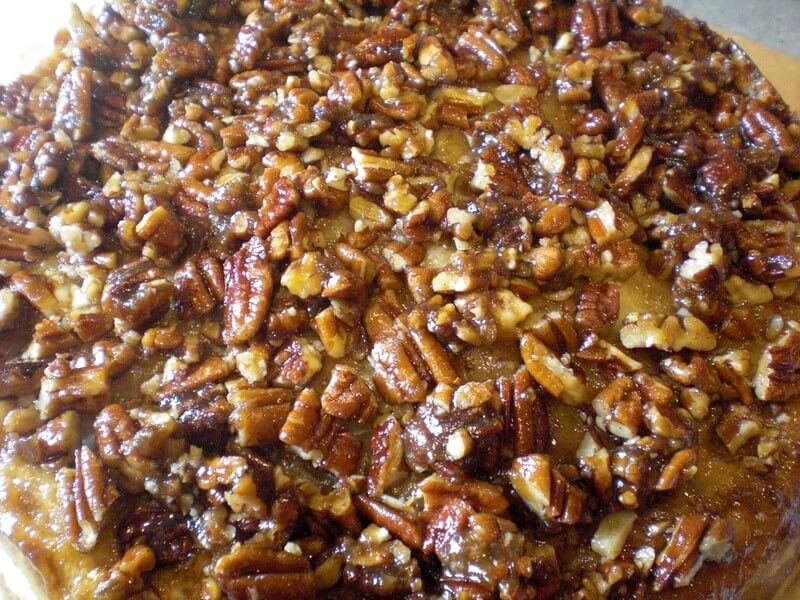
How can one not fall madly in love with pecans tossed in melted butter and brown sugar, knowing it will be baked into gooey pecan roll-like oblivion?  With apple pie underneath.


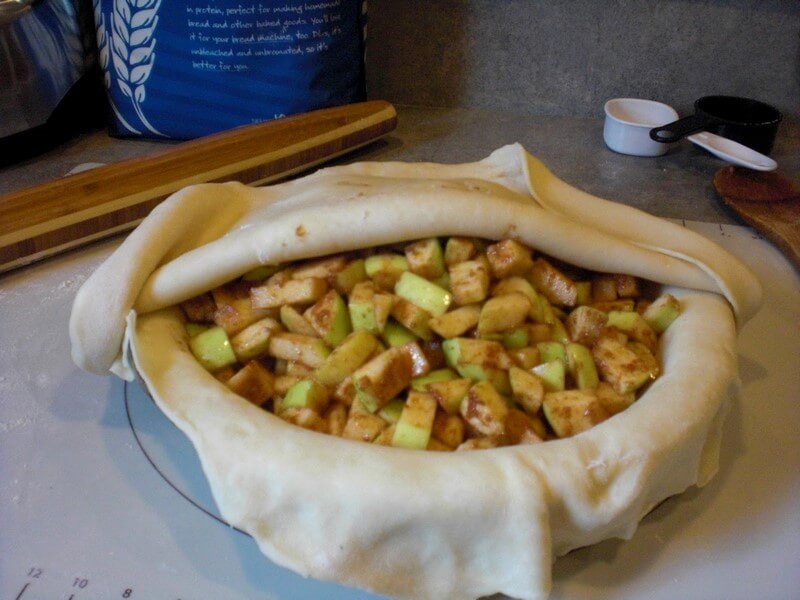
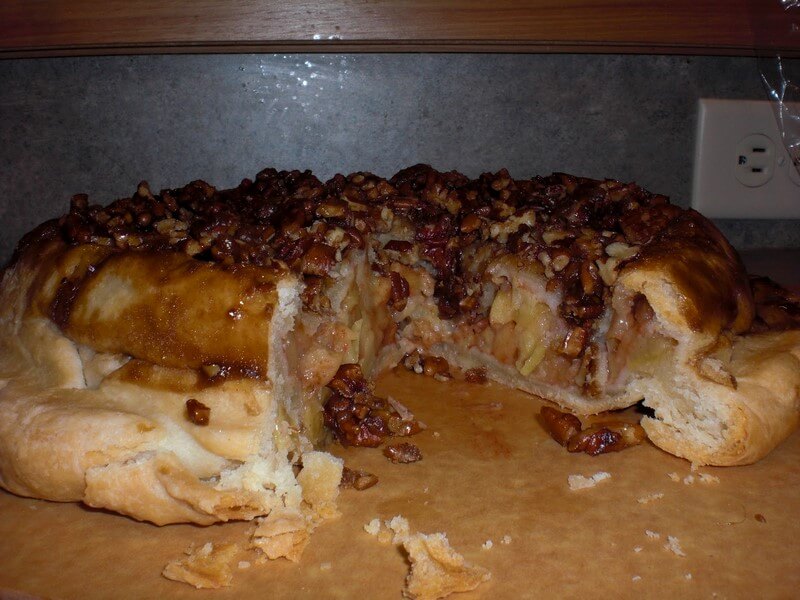
A double crusted delight.  


After it bakes you put a plate on top and turn it upside-down so the pecan roll-like heaven smiles at you from the top.


There is absolutely no reason not to love this pie.


Upside-Down Apple Pie

Adapted from My Recipes

Ingredients

Crust (adapted from Baking by James Peterson):

3 cups all-purpose flour
3/4 tsp salt
1 cup + 2 tbsp cold butter, cut into small pieces
1/2 cup + 2 tbsp ice water
3 tbsp additional ice water as needed

Filling:

  • 1 1/2 cups chopped pecans
  • 3/4 cup firmly packed brown sugar
  • 1/2 cup butter, melted
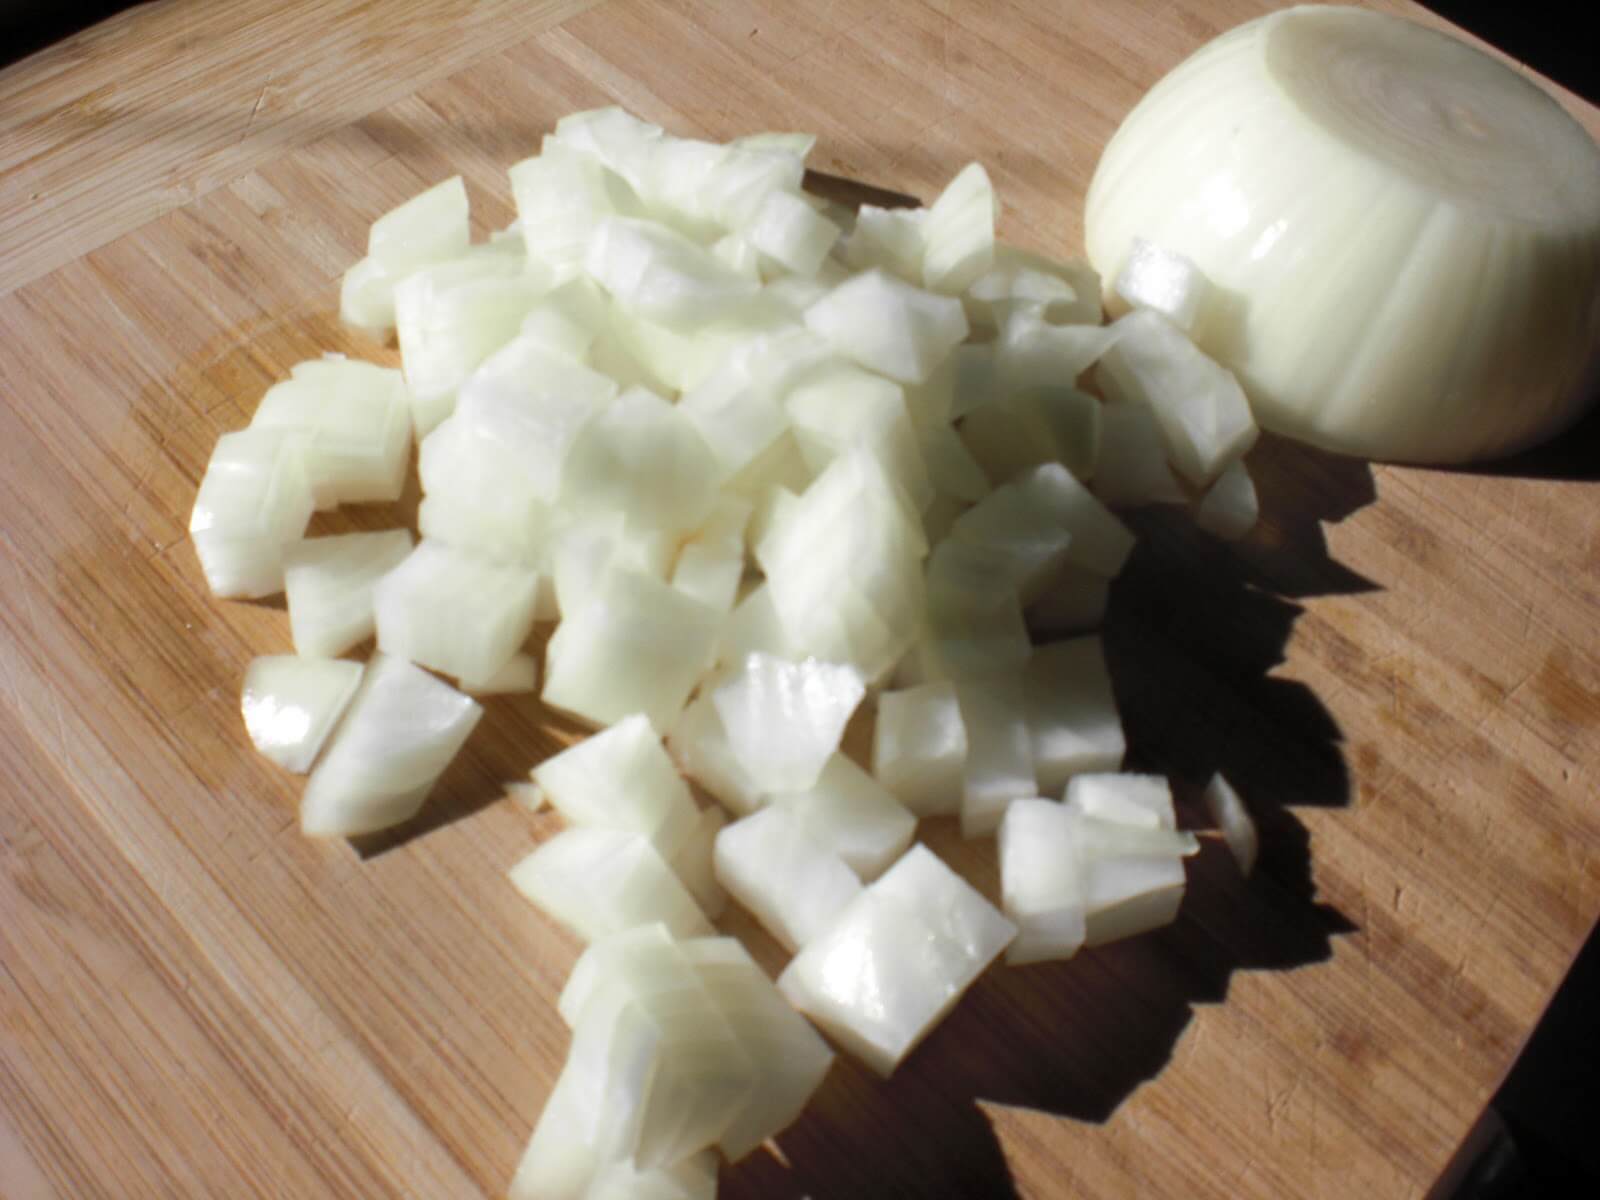
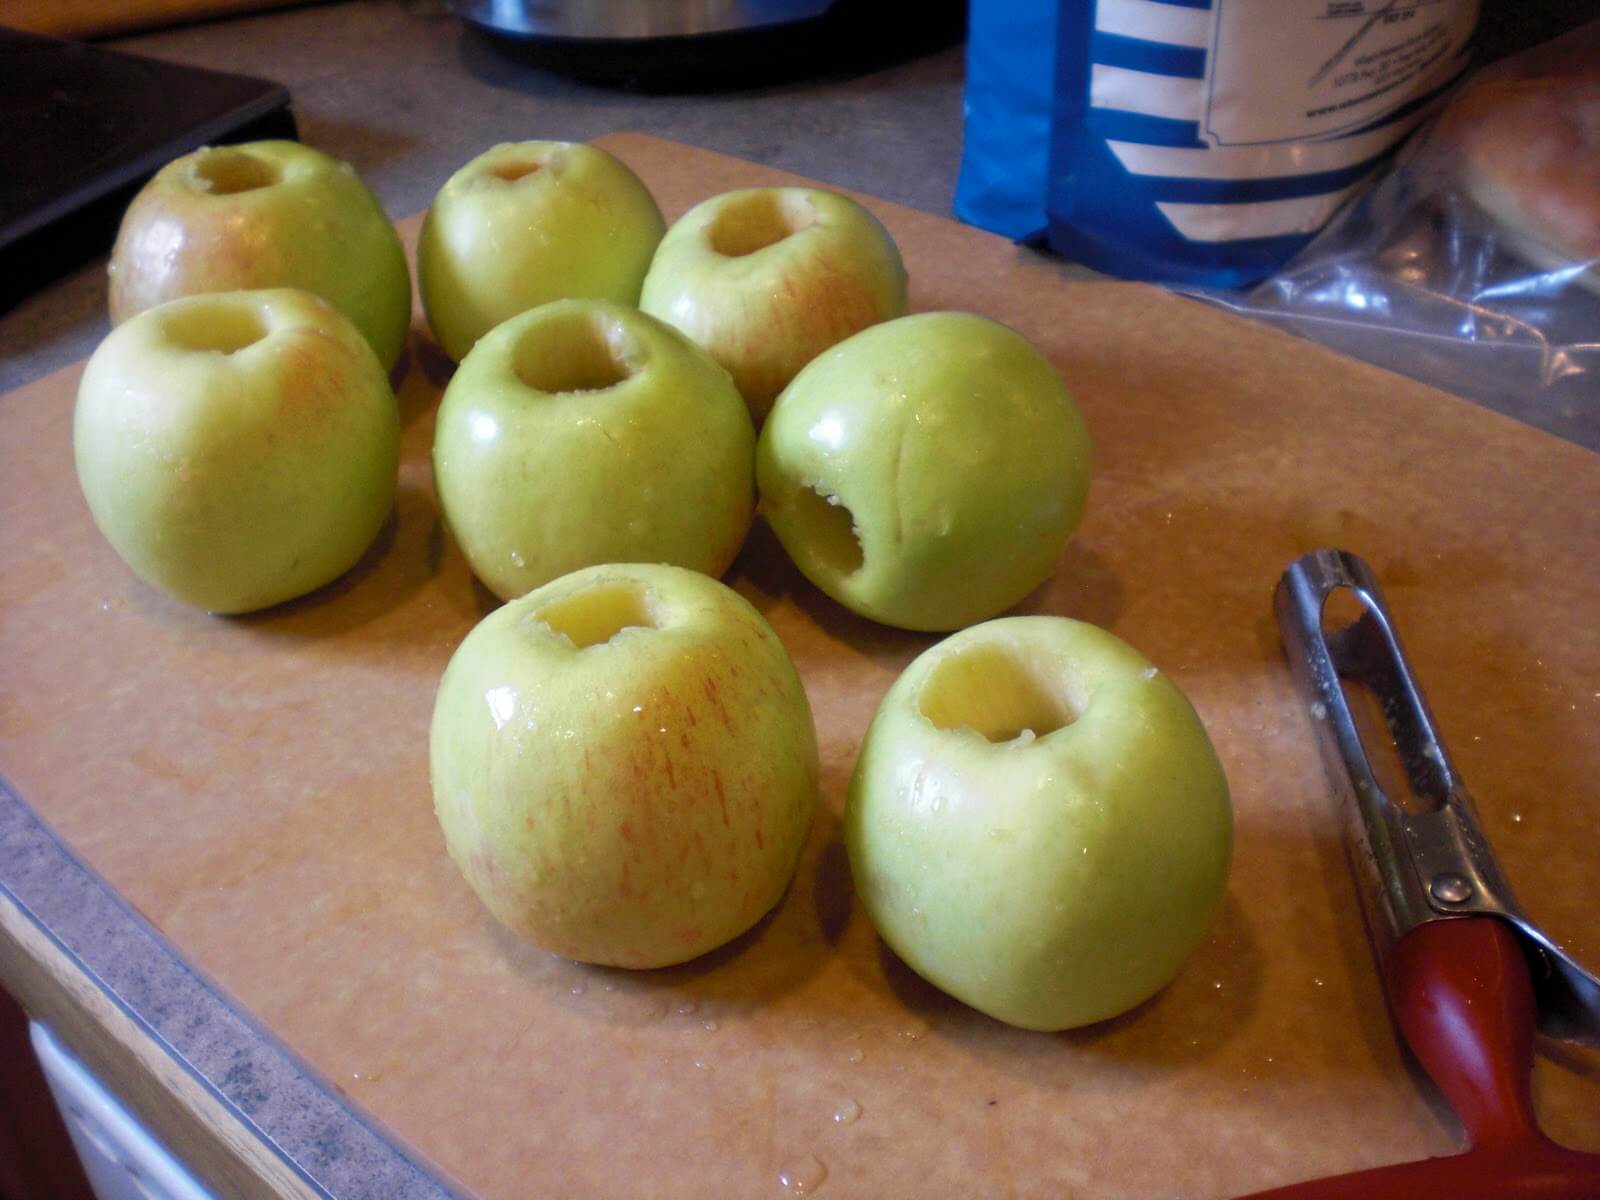
  • 5 Granny Smith apples (approx 2 1/2 lbs), peeled cored and chopped into 1" pieces
  • 1/4 cup granulated sugar
  • 2 tbsp all-purpose flour
  • 1 1/2 tsp ground cinnamon
  • 1/2 tsp fresh ground nutmeg

Directions

  • To make the crust: combine flour and salt in the bowl of a stand mixer fitted with a paddle and mix on low speed for 30 seconds.  Add the cold butter and mix on medium speed until gravelly, about 2 minutes.  Add water and mix on low speed until the dough comes together and starts to form a ball.  If the dough is still dry, add ice water 1 teaspoon at a time until it comes together. Remove dough from stand mixer, cut dough in half and form into two discs.  Wrap the discs separately in plastic wrap and put in the fridge.
  • Preheat oven to 375°. Stir together pecans, brown sugar and melted butter and spread onto bottom of a 9-inch deep dish pie plate. 
Remove one pie disc and roll on a lightly floured surface into an 11" circle.  Fit pie crust over pecan mixture in pie plate, allowing excess crust to hang over sides.

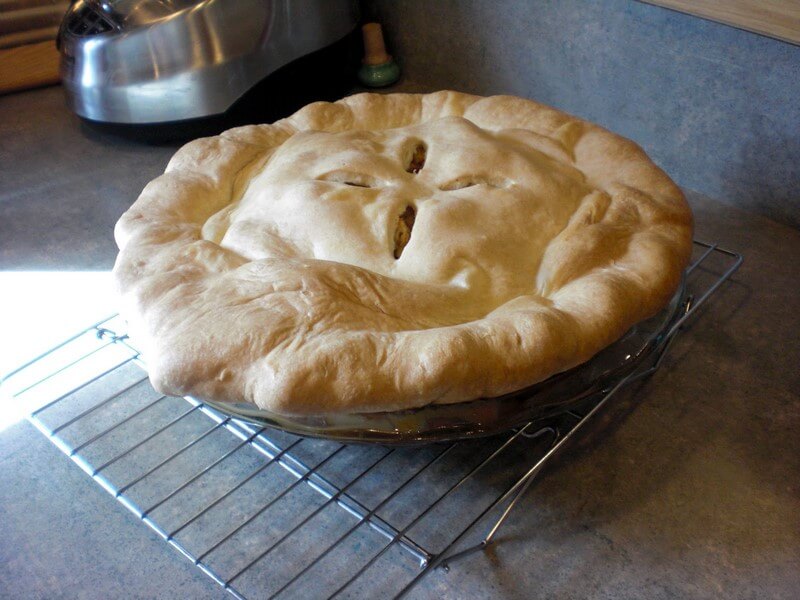
Stir together apples, sugar, flour, cinnamon and nutmeg. Spoon mixture into crust, packing tightly and mounding in center. Repeat instruction above for rolling out second pie crust.  Place remaining pie crust over filling; press both crusts together, fold edges under, and crimp. Place pie on an aluminum foil-lined jelly-roll pan to catch spills. Cut 4 slits in top of pie for steam to escape.

  • Bake at 375° on lower oven rack 45 minutes to 1 hour, or until juices are thick and bubbly, crust is golden brown, and apples are tender when pierced with a toothpick through slits in crust. Shield pie with aluminum foil after 50 minutes, if necessary, to prevent excessive browning. Cool on wire rack 10 minutes. Place a serving plate over top of pie; invert pie onto serving plate. Remove pie plate, and replace any remaining pecans in pie plate on top of pie. Let cool completely (about 1 hour).
Oh, and you must eat this with vanilla ice cream!

Tuesday, September 20, 2011

Monkey Pack!


I have been struggling with my outings with Anna lately because she doesn't like to be detached from my hip in public.  So, to avoid being that Mom in the grocery store, I find myself carrying her on one hip, pushing the packed grocery cart with my other arm and using a swift kick with my foot to steer it.  Its still a bit of a spectacle, but hey, at least she's not screaming, right?  Yeah.  But, girlfriend is starting to get some heft to her, and its only so long before I have no choice but to stick her back in the cart/stroller and I am immediately transformed into that Mom.  Sigh...

When we were in St. Louis a few weeks ago Mace kept putting Anna on my back and chasing me around with her.  She thought this was the funniest thing ever and it gave me an idea.  We need one of those monkey packs!  So far we've only taken it on one walk to the park, but the walk ensued without tears, without screaming and even produced a few laughs when she'd try to peek at me from around my shoulders.  I hope we're onto something here!


Monkey pack!

Sunday, September 18, 2011

Falafel & Pita Bread


OH. MY. WORD.  I cannot believe my luck in stumbling upon this recipe.  This is far and away one of the best meals I have ever made!  Wowza!  I can't even begin to describe the party that ensued in my mouth after the first bite...crisp on the outside, soft in the middle.  Perfection.


The thing is, I was in a foul foul mood when I started cooking this meal.  Anna had refused to sleep the night before, I have a cold, it was a busy busy day.  I wanted to plunk on the couch, watch a movie and whine.  But, as usual, cooking worked its magic and energized me.  I started kneading the dough, pulsing my food processor, and suddenly I was singing and dancing around the kitchen.  Brother forming falafel balls behind me and Anna tugging at my apron. 


This wasn't a difficult meal to make, but you do need to have some forethought in planning it.  You need to soak the beans overnight and the pita bread needs a good two hours to rise.  So, this is a good weekend project if you are going to make it all fresh.  Alternately, the pitas would freeze well and you could have them on hand and pull them out in the morning.  I think the falafel would freeze well too, but haven't tried it yet.  I'll let you know if I do.  See note below in recipe...these DO freeze well!  Fried right out of the freezer.

According to Reeni, of Cinnamon Girl, do not even bother with canned beans.  Its dried beans ,or bust!  I didn't contemplate it for even a second after her tirade against canned beans and her mention of several failed attempts.  I will learn from her mistakes here and save myself the pain.

The falafel are deep fried, but don't let this deter you from making this recipe.  The key to deep frying is keeping the oil hot enough (350-375 degrees) that things don't get soggy and absorb too much oil, so a thermometer is a must.  And also, a deepish pot (not a skillet) is essential so the oil doesn't spatter.  It's easy though, I promise!!  You just have to give is a little love.  Awww...


Its really important to have good helpers too, to direct you along the way!


Falafel & Tzatziki

Adapted from Saveur & Cinnamon Girl

Ingredients

Tzatziki:
2 cloves garlic, finely chopped

1 cucumber peeled, seeded and chopped
1/2 cup finely chopped flat-leaf parsley
1 Tbsp fresh lemon juice

1 Tbsp fresh dill
1 cup Greek yogurt
Salt, to taste

Falafel:
1 1/2 cups dried chickpeas
1 cup roughly chopped flat-leaf parsley
1 tsp flour
1 tsp ground coriander
1 1/2 tsp ground cumin (I love me some cumin, so adjust accordingly if you don't)
3 cloves garlic, roughly chopped
1 small red onion, roughly chopped
Salt, to taste
Canola oil, for frying
Warm pita, for serving (recipe below)


Directions

Make the sauce: Place all ingredients in a food processor except the yogurt.  Pulse until smooth.  Add yogurt and pulse until just combined.  Don't overdo it, or the sauce will get too runny (trust me, I know).

Make the falafel: In a medium bowl soak chickpeas in cold water overnight (8+ hours). Drain water and place chickpeas in a food processor with parsley, flour, coriander, cumin, garlic and onions. Pulse mixture until it is well combined but still coarse in texture.  Salt to taste. Chill in freezer for 30 minutes. Use a spoon to portion the mixture into 2-inch balls. *Make Ahead instructions below.
Pour 2" oil into a heavy sauce pan and heat over medium-high heat until a thermometer reads 350˚. Working in batches, fry falafel balls, turning occasionally, until they float and turn golden brown, about 2-3 minutes. Using a slotted spoon, transfer falafel to a rack set over a rimmed baking sheet. Before frying the next batch make sure your oil is back up to 350˚.


Serve in pita with the tzatziki sauce. This is also good with feta, tomatoes and lettuce for fixings.


*MAKE AHEAD:  At this point, put falafel balls on freezer-safe tray lined with parchment paper and freeze at least 3 hours.  Once frozen put in a freezer-safe container and store for up to 2 months.  When you are ready to use follow frying instructions above and you have a delicious homemade meal!


Pita Bread


Adapted from Cinnamon Girl


Ingredients
1 teaspoon active dry yeast
3 ½ cups flour
1 tablespoon sugar
2 teaspoons kosher salt
2 tablespoons olive oil


Directions

Stir together yeast and 1¼ cups warm water in the bowl of a stand mixer fited with dough hook attachment, and let sit until foamy, about 10 minutes. Whisk flour, sugar, and salt in a large bowl.  Add oil to yeast and then add flour mixture.  Knead on medium speed until smooth, about 5 minutes. Transfer to an oiled bowl and cover with plastic wrap; let sit until doubled in size, about 2 hours.

Punch down dough and divide into 8 equal pieces, knead each into a ball. Place balls on a floured surface, lightly spray with cooking oil and cover with plastic wrap. Allow to rise for 30 minutes.

Heat a 12″ skillet over medium-high heat. Working with 1 ball of dough at a time, transfer to a work surface and roll into a 6-7″ circle, brush with oil and add to skillet, oiled side down, brush top with oil. Cook, turning once, until browned and cooked through, 2–3 minutes.  *Make Ahead instructions below.

Eat
it!!


*MAKE AHEAD: Allow pita bread to cool and then put into freezer bag or other freezer-safe container and store up to two months.  When you are ready to use, take them out of the freezer and allow to thaw at room temperature for at least 3 hours.

Friday, September 16, 2011

Fresh Pasta with Tomato & Mushroom Sauce


There is something about a simple Italian dish that makes life feel robust, full, delightful.  Especially when you share it with loved ones.  My brother, Zach, is in town this weekend and I am beyond excited to have someone to cook for and with for a few days.  In my usual fervor of anticipating a weekend of cooking, I started pouring over the recipes I have tucked away in the "to make someday" file.  This was the first one I busted out of my arsenal...simple, delicious, filling and let's just say, perfect.  Enjoy!


Fresh Pasta with Tomato & Mushroom Sauce

Adapted from la cucina italiana magazine

Ingredients

Sauce
  • 1 leafy sprig rosemary
  • 1/3 cup roughly chopped flat-leaf parsley
  •  2 garlic cloves, roughly chopped
  • 1 teaspoon fresh thyme leaves
  • 3 tablespoons unsalted butter, cut into small pieces
  • 2 tablespoons extra-virgin olive oil
  • 1 (28-ounce can) whole peeled tomatoes with 1/2 cup of their juices reserved
  • 1/2 teaspoon salt
  • 3/4 pound fresh field mushrooms (shitake, porcini, etc) roughly chopped
Pasta (yields 1 pound of dough)
  • 3 eggs
  • 2 cups flour
  • 1 tablespoon olive oil
  • 1 egg white, as needed

Instructions

Remove leaves from rosemary sprig. In center of cutting board, mound rosemary leaves, parsley, garlic and thyme; finely chop together.
In a large skillet with lid, combine herb mixture, butter and oil; heat over medium-high heat, stirring occasionally, until butter is foaming. Add tomatoes with 1/2 cup of their juices and salt; bring to a simmer and cook, breaking up tomatoes, for 5 minutes, then stir in mushrooms. Reduce heat to low and gently simmer, covered, until mushrooms are tender and sauce is flavorful, about 30 minutes.
Meanwhile, make the pasta.  Combine eggs, flour and oil in a food processor and pulse until it comes together in a cohesive mass.  If it doesn't come together add an additional egg white and pulse again.  Remove from the food processor and knead several times by hand on a lightly floured surface until the dough comes together in a ball.
Divide the dough into thirds, take one and cover the rest with plastic wrap.  With your dough ball in hand, run it through a pasta machine until you are at the thinnest setting the dough will take without ripping (on my Kitchenaid pasta maker this was a 7).  Repeat with additional dough balls.  You could potentially do this without a pasta maker but it will be hard to get the dough thin enough. 
Cut the pasta sheets into wide 2" strips with a pizza cutter.  You can leave these to dry on the counter until you cook them.
Bring a large pot of water to a boil. When sauce is very close to done, cook pasta in the boiling water.  Fresh pasta only needs about 2 minutes to cook, so don't overdo it.  Drain pasta and transfer to a large bowl. Add sauce and toss to combine well. Season and serve immediately.

Wednesday, September 14, 2011

Off I go...follow me!


So, here I go on my first blogging adventure. I am unsure of the exact direction I want this to go, but I envision it as a mix of the two things I am most passionate about in this world: family and cooking.  Without my amazing husband, beautiful daughter and rest of our huge wonderful family I would be nowhere in this world. Cooking and food is my creative outlet and fills me with joy, pride and peacefulness.  I am always excited to share my joy of cooking with anyone who is willing to listen but most of all willing to eat!
So, come along and join me on this ride of family and food…because really, is there anything cooler in the world than these two things? Especially when they are combined?   Not a chance!