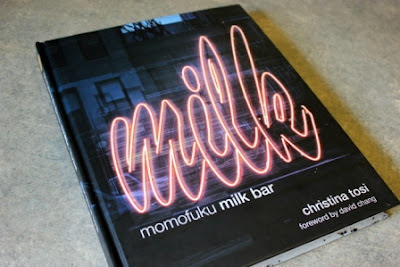
I have a wicked crush on a girl. And my husband is ecstatic about it. (And no...don't even go there.) This is not a crush born of carnal need or lust. It is a crush born of sugar, chocolate and a woman who is so full of baking genius it makes me gush with love. Many of us are familiar with her, and if you are, you probably have a crush too. Christina Tosi is simply amazing.
 |
| Best baking cookbook I have ever laid eyes on. |
These desserts are why my husband is happy about my crush. He isn't jealous and he doesn't feel displaced in the least bit. Desserts have been pouring into this household, and he's never one to complain about having sweets around.
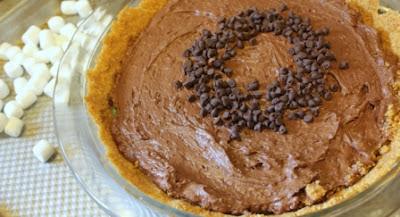
The Grasshopper Pie was the first thing I chose to make when I got my grubby little hands on this book. Regarding the level of difficulty, this was one of Christina's easier recipes. It still took some time, but it was fairly straightforward as far as baking techniques go. I'm not going to lie...this pie was incredibly rich. Like make-your-head-hurt sugary sweet. It was awesome. We figured out that if it is served from the refrigerator rather than at room temperature though, it mellows the sweetness and suddenly it is not just awesome, but swoon-worthy.
PRINT THIS RECIPE!
Milk Bar Grasshopper Pie
Graham Cracker Crust:
1 1/2 cups (90 g) graham cracker crumbs
1/4 cup (20g) dried milk powder
2 tablespoons sugar
3/4 teaspoon kosher salt
4 tablespoons (1/2 stick) unsalted butter, melted
1/4 cup (55g) heavy cream
Grasshopper Pie:
4 1/2 ounces 72% chocolate, roughly chopped
6 tablespoons unsalted butter
2 large eggs
3/4 cup (150g) sugar
1/4 cup (40g) all-purpose flour
3 tablespoons dutch-process cocoa powder
1/2 teaspoon kosher salt
1/2 cup (110g) heavy cream
2 tablespoons (20g) mini-chocolate chips
1/2 cup (25g) mini-marshmallows
Mint Cheesecake Filling:
2 ounces white chocolate
2 tablespoons grapeseed or canola oil
2 1/2 ounces (75g) cream cheese, softened
2 tablespoons powdered sugar
1/2 teaspoon peppermint extract
1/4 teaspoon kosher salt
2 drops green food coloring
Mint Glaze:
1 ounce white chocolate
2 teaspoons grapeseed or canola oil
scant 1/8 teaspoon peppermint extract
1 drop green food coloring
Preheat oven to 350F.
Make the graham cracker crust: Whisk graham cracker crumbs, milk, sugar and salt in a medium bowl to thoroughly combine. Whisk the butter and cream together and add to the dry ingredients. Using your hands, toss all the ingredients together to evenly coat. As you are tossing, it will start clumping together. Press it together with your finger tips and it should hold its shape. If it doesn't, add up to an additional 1 1/2 tablespoons of melted butter until desired consistency.
Add 1 1/4 cups (110g) of graham cracker crumb mixture to a 10-inch pie pan. Working with your hands press the mixture on the bottom and up the sides of the pie pan. Set aside.
Make the chocolate filling: Combine butter and chocolate in a small bowl and microwave for 30 seconds. If mixture is not mostly melted, microwave an additional 20-30 seconds. Use a spatula to stir ingredients together until silky and smooth.
Combine the eggs and sugar in a stand mixer fitted with the whisk and whip for 3-4 minutes. You will know they are done when they reach the ribbon state, which Christina describes as this: detach the whisk and dunk it into the egg mixture. Wave it back and forth like a pendulum and the mixture should form thick silky ribbons that fall and then disappear into the mixture. Continue whipping mixture until it reaches this state.
Change stand mixer attachment to the paddle. Add the melted chocolate mixture into the eggs and paddle briefly on low and then increase the speed to medium for one minute or until the entire mixture is completely brown with no streaks remaining. Scrape down the sides of the bowl with a spatula.
Add flour, cocoa and salt to the egg and chocolate mixture and paddle on low for 1 minute or until no lumps of dry ingredients remain. Scrape down the sides of the bowl with a spatula.
With the mixer on low, slowly pour in the heavy cream and mix for 30-45 seconds or until the cream is fully incorporated and no white streaks remain. Scrape down the sides of the bowl with a spatula.
Remove mixer bowl from mixer and gently fold in 1/4 cup (45g) of remaining graham cracker crust crumbs.
Make the mint cheesecake filling: In a heat proof bowl, combine the white chocolate and oil and microwave for 30 seconds. If mixture is not mostly melted, microwave an additional 20-30 seconds. Use a spatula to stir ingredients together until silky and smooth.
Combine cream cheese and powdered sugar in a stand mixer fitted with the paddle and mix on medium-low for 3 minutes. Scrape down the sides of the bowl. With the mixer on low, slowly add the white chocolate mixture and paddle for 1-2 minutes or until completely combined. Scrape down the sides of the bowl.
Add peppermint extract, salt and food coloring to the mixer bowl and paddle for 1-2 minutes or until thoroughly combined and the mixture is consistently green.
Assemble the pie: Place the graham cracker pie shell on a baking sheet. Pour the mint cheesecake filling into the pie crust and spread evenly over the bottom. Pour the chocolate mixture on top of the mint filling and spread evenly to the edges. Sprinkle the mini-chocolate chips in a bulls eye around the center and then the marshmallows around the outer edge of the pie.
Bake for 25 minutes until the edges are slightly puffy and the center still jiggles just a little bit. The marshmallows will be tanned and the chocolate chips will have just started melting at this point.
Cool the pie completely before adding the mint glaze.
Mint Glaze: In a heat proof bowl, combine the white chocolate and oil and microwave for 30 seconds. If mixture is not mostly melted, microwave an additional 20-30 seconds. Use a spatula to stir ingredients together until silky and smooth. Stir in the peppermint extract and food coloring until completely homogeneous in color. Allow to cool for 15-20 minutes.
Using a fork, dunk the tines into the mint glaze and dangle the fork over the pie to create crisscrossing lines on the pie. Put the pie in the fridge for 4-6 hours before serving to thoroughly chill (Christina doesn't say to do this, so it is a preference on my part, but we found the pie was significantly less rich and much more delicious eaten this way). Once the pie is thoroughly chilled, cut it into slices and...
EAT IT!!
| I caught a little pie-snatcher in the act! |

I love mint chocolate so this pie sounds perfect! I love the picture of your little pie grubber! That's why I can never take pictures when my kids are around, or their hand are in EVERY shot!
ReplyDeleteI think a first-name basis is totally OK. Good for your man to know when to be jealous and when to be grateful! And I love your last photo of the pie snatcher; too cute!
ReplyDeleteI have been putting off buying this book and it has been very difficult. Like you I do feel the need sometimes to really get into a good baking project and this book is the perfect source. Funny I saw someone comment on this book saying "there is nothing but really sweet stuff in there"-well duh, they should not have expected anything else!
ReplyDeleteThis dessert is not only eye catching it has a lot of delicious flavor layers. Also pretty neat that the recipe for the chocolate is unique to the mint. Most recipes would make the same and then differentiate from the flavors.
Great post and happy Friday!
I love, love, love her desserts. I am glad they take a little bit of effort because otherwise I would be making them everyday. That would not be good for the waist line.
ReplyDeleteI used to be scared of recipes with too many ingredients and steps, but when they're broken down into different sections, it makes it easier to process. This definitely looks like something I neeeeed!
ReplyDeleteScrumptious looking pie, Maggie! I love Christina's recipes - indulgence all the way! The last photo is precious :)
ReplyDeleteGrasshopper pie was something my grandmother always made for us when we visited. She liked that we thought it was a funny name for a pie! Lots of steps... glad to hear it was worth it!
ReplyDeleteI couldn't email you (your settings to to noreply@...) I knew you were in MT, too, but had forgotten! Haha! I found another food blogger in Grt Falls... you might want to check Rhonda's blog out: http://www.thekitchenwitchblog.com/
ReplyDeleteWho is the other blogger in Missoula? I'd like to see her blog :)
oh my god this looks absolutely amazing!
ReplyDeletethis looks beautiful! i've been baking my way through the Milk Bar cookbook for a few months now, but i haven't gotten to this recipe yet. you did a fabulous job! how gorgeous.
ReplyDeleteI am in the middle of my first Momofuku recipe...the crack pie! I hope mine looks as gorgeous as yours!!!
ReplyDeleteHow can you deny yourself (or the hubby) the fuku? Answer: you. can't!
I have really been wanting this book, but I'm afraid of what it will do to my diet! lol This pie looks amazing!!
ReplyDeleteOh wow! this is stunning! Momofuku is from an alien planet... pure perfection.
ReplyDeleteYum! This looks incredible! You created a beautiful presentation. Girl crushes are totally okay, especially when they're based on food! I'm ashamed to say I've yet to try any of Christina's recipes...I must get on that!
ReplyDeleteI desperately want to go to Milk Bar when I am next in NYC. I know these recipes are complicated--you totally did this one justice!
ReplyDeleteThis pie looks crazy delicious filled with every sweet treat anyone could ever want :D
ReplyDeleteYum!!!
Cheers
Choc Chip Uru
Your crush is totally valid...I understand and so do a lot of people too. I hope to get a copy of her book as well. =)This treat looks really drool worthy.
ReplyDeleteShe has the most creative recipes! Your grasshopper pie looks so decadent :)
ReplyDeleteThat is one stunning piece of work - well done! Just started following you :)
ReplyDeleteHi there! I just found you through Shannon at A Periodic Table and wanted to say hello. I like your site a lot and this pie looks divine. I didn't like the mint-chocolate combo until a few years ago. Weird, right? Now I LOVE IT.
ReplyDeleteTake care!
Katherine
Who doesnt love Christina Tosi??!! I love her recipes! You did an amazing job with this pie! It looks delicious.
ReplyDeleteI need to see this book! What a great looking pie!
ReplyDeleteI have a girl crush on Tosi, too! This pie looks great :D
ReplyDeleteMaggie,
ReplyDeleteI think I might have just drooled all over your pie! It's probably lucky it's long gone by now! This looks incrediable! Have a great week sweetie!
This is so cute! I love your last pic revealing your little pie snatcher caught in the act.
ReplyDeleteI'm a big fan of Christina Tosi but have not tried baking any of her recipes yet. Your pie looks wonderful!
I love the last sentence... EAT IT! :D
ReplyDelete